In [0]:
%run ../lib1/pkg1/Blaher
In [0]:
%run ../lib1/pkg1/MultiBlaher
In [0]:
%run ../lib1/pkg2/mod3
In [0]:
%run ../lib1/pkg2/mod4

Today we’re launching a new series of posts here on Pivotal BI, this time around the subject of development on the amazing unified analytics platform that is databricks.
We’ll be focussing particularly on the practical aspects of ways of working, technical deep dives and the often unexplored elements that make the difference between short term ‘fly-by’ implementations and those more grounded longer term initiatives.
Right, without further ado we’ll dive in with the first post, looking at the differences between using notebooks and IDEs for development.
In this post we’ll be looking at why you may want to consider alternatives to databricks notebooks for development and what it means for teams starting out on the unified analytics platform. We’ll go through some of the common areas of difficulty with notebook development on databricks and how they compare with using an IDE. This post is based on my own experiences of implementing projects with clients on the platform, and as such should be taken as my own opinion on the matter. Something hopefully to take on board for consideration rather than dogma, mantra, gospel or any other theologically aligned thinking on the matter. Ultimately things depend on your own needs and circumstances, and hopefully this article will help with awareness of other ways of working.
If you’ve done any development on databricks you’ve probably used databricks notebooks. They are the first point of call for many of us working with data on the platform. Very popular with Data Scientists in particular, they provide an environment whereby data transformation, wrangling, munging or whatever your preferred terms for generally ‘doing stuff’ with data, and visualising the results, is readily accessible. There is no software to install, no real configuration and a generally gentle learning curve to getting working. The team can easily collaborate by creating their notebooks in workspaces and progress on their data journeys unhindered. Based on Jupyter notebooks, they offer great functionality and compatibility with a well established platform widely in use across Data Science teams. For some ways of working, such as data exploration, quick analysis exercises and so forth they are very appealing. Many very mature data teams never really leave the notebook environment, finding all they need in this native offering.
Another popular use for notebooks is to quickly ‘proof out’ something before moving onto more in-depth development work. The ease with which you can execute and visualise results makes databricks notebooks ideal for these rapid turn-around development tasks.
Before I find myself cast as the pantomime villain, just to be clear, there is absolutely nothing ‘bad’ about development with just notebooks, after all they are perfectly capable of implementing code across all aspects of the databricks analytics platform. They were however, at least as far as I can tell, not really intended to serve as fully fledged complex development environments.
As many teams have discovered, when you get into the more involved data engineering activities, working with code that would benefit from improved structuring, visibility and reuse for example, you may find yourself wanting to revisit this development approach. From what we’ve experienced, there is a definite tipping point beyond which working in this fashion has considerable impact on developer productivity in these settings. When trying to exercise any of the well established modern development practices that are second nature to most developers, such as breaking down the code into encapsulated modules, refactoring elements of the code, and writing unit tests to accompany your code, notebooks-based development poses a lot of challenges. Any of these aspects of development that are taken for granted in a respectable Integrated Development Environment (IDE) are not readily available to your notebook endeavours. As things progress further you’ll inevitably find maintaining and expanding on your efforts to be increasingly difficult and productivity is likely to suffer considerably as a result.
Okay, enough doom mongering for one lifetime. The simple solution when you’re struggling with one tool is of course to change to one better suited for the job at hand. For complex data engineering or analytical developments on databricks, this means pretty much the same as with any substantial code effort. Using an IDE.

Whenever we see clients that are set on the attractive simplicities of notebook-based development, we always make them aware of the alternative ways of working that IDEs offer. This allows them to best understand the overheads and feasibility of each approach and make informed decision as to which will best suit their needs. After all, in the short term notebook-based development may be fine, but looking to what will be required as time and demands progress to the next level of development complexity is what will determine the best approach.
Here’s some of the development experiences that have a noticeable difference across the two ways of working.
In Python, Scala, Java and just about any other language you’ll be used to structuring your code into libraries, packages and modules or their equivalents, with best practices for how to structure the files. You’ll be familiar with distribution of these logical units and referencing from within your code using import statements. Navigating your code in the IDE is straight forward, structured into projects, and assisted with search and ‘Go To Definition’ functionality for all your code. You can quickly bounce around from one block of code to another in another file somewhere like an over-caffeinated tech-evangelist tipsy on the latest coolaid.
As part of encapsulating your development code, you may have created various databricks notebooks, perhaps grouping up functions and classes like in standard modules in Python. You might even put these in a hierarchy of folder in order to structure them better, like you would do with Python packages and modules. This does of course help prevent duplication of code and aid with understanding and reuse and should help make your notebook-based development easier to manage.
Note however that you won’t have a true Library\Package\Module hierarchy, as the folder structure doesn’t enforce any concept of scope to your code definitions. Any functions or classes that are defined in one notebook will clash with same named definitions in other notebooks regardless of folder structure, unlike how Python or Scala code is structured.
The notebook navigation experience in the workspace isn’t the best however, and you’ll find yourself opening a lot of tabs to navigate between different notebooks as you refer to various elements of your code. The UI isn’t really intended for too much to-ing and -fro-ing between notebooks, preferring a more ‘all in one place’ way of working. You may start to get a little dizzy as you find your way around the various browser tabs of your code.
Not much to say here really, you structure your code into projects, packages and modules and add the respective import statements. If you want to refactor files, move things around or whatever, the IDE generally takes care of ensuring that everything still lines up nicely.
In order to make use of your nicely structured notebook development, you’ll need to make sure it has been loaded into your spark session, by running the required notebooks on which your databricks code depends. You’ll soon find yourself having to maintain rather ugly notebooks that are wrappers for calling all these required other notebooks, with lots of %run magic statements such as the ‘run_all’ notebook below:
%run ../lib1/pkg1/Blaher
%run ../lib1/pkg1/MultiBlaher
%run ../lib1/pkg2/mod3
%run ../lib1/pkg2/mod4
and then make sure that you call this notebook wherever you need to make use of the code, as shown with the Python code below:
%run ../lib1/run_all
# give me a 'blah'
bl = Blaher()
print(bl.add_blah('just say '))

# give me another 5 'blah's
mbl = MultiBlaher()
print(mbl.add_blah_multi('and then say ', 5))
# found in lib1/pkg2/mod3
print(hello_world())

# found in lib1/pkg2/mod4
print(adieu_mon_ami('Nigel'))
This can introduce some development pains. Neglecting to add the required %run statements for loading the new elements of code is easily done, resulting in calls to undefined code. Additionally, should you decide to restructure your code through some attempts at refactoring you’ll find yourself having to rehash a load of paths in these wrappers. It is easy to introduce bugs and harder to improve your code as a result, both of which will impact your notebooks development productivity.
In both databricks notebooks and IDE projects development you can of course reference libraries in the standard fashion for the language in question. Again we use an import statement approach, ensuring that the libraries in question are made available on the cluster executing the code or within the session in question.
I’ll talk later in the series on different ways of making these libraries available to your executing code, as there are some differences around managing the impact of updates to the libraries.
Every modern IDE has some degree of integration with unit testing frameworks built in, either in the core product or through various plugins/extensions. You can often right-click on an element of your code and ‘Generate Unit Tests’ in order to quickly sketch out some tests and get started on ensuring things actually work. You may be following Test-Driven Development (TDD) and working very tightly between code and validation/verification, and your IDE will try to make this a generally happy experience for all involved. Executing your tests either in isolation or as part of a suite is simple, efficient and transparent. You can find out more on IDE testing functionality for PyCharm here, JetBrains IDEA Scala here, and for Visual Studio Code python testing here. I’ll be going into testing in a number of later posts in the series.
In notebooks development on databricks you’ll be preferably grouping suites into the same notebook and then executing either the whole notebook or individual cells in the case of specific test cases, and don’t have this functionality available. You can of course reference unit testing frameworks such as PyTest or ScalaTest and crack on with implementing tests, but the ease with which you can exercise and get feedback on these is limited. Depending on how much you embrace testing as part of your work (and the general advise is to make it at least a big enough part to avoid embarrassment or the QA firing squad) you will find this may have a real impact.
In the IDE world of course we have nice debuggers that allow stepping through, over, around, behind your code like Donnie Yen in an Ip Man movie when you need to figure out why your code has coughed up the odd fur ball. Variables are available for inspection that point you happily along the way to bug squishing and all is happy once more. These tools are pretty indispensable and you soon see why.
In databricks notebooks you run your cell, check the results and hopefully it did what you expected or if not and you’re lucky it is obvious where the development went belly up. However, there are times when you really really need to see what is happening on each line, and where that bug is creeping in. Not being able to step into your code leaves you splattering your notebook development efforts with print() statements and the like in an attempt to play hunt the gremlin. Then at some point when you find the foible you then go back and remove all those print() splatters and finally get back to coding. Not great.
I won’t go into all the other advantages of using an IDE as we’ve all got better things to be doing. Suffice to say IDEs such as PyCharm, Intellij IDEA, VS Code and the like are generally crammed with a trove of productivity enhancing tools and functionality that will make your development a different league. With the community editions having such fantastic features you won’t need to shell out a penny, though for some the non-gratis editions may of course have somethings additional to offer worth the price tag.
Here’s a quick summary of the above points:
Functionality | IDE | Notebook |
|---|---|---|
Data Visualisation | ||
Rapid Prototyping | ||
Ad-hoc Analysis and Exploration | ||
Code Structure and Navigation | ||
Referencing Your Code | ||
Testing | ||
Debugging | ||
Code Editing Productivity |
No-one said it has to be either/or of course. For many teams, the IDE is the tool of choice for the more complex library code development, with the productivity gains that IDEs offer. The notebook is there to tap in to these libraries, providing a development interface for further manipulating, exploring and visualising the resultant datasets. Each approach plays to its strengths.
What to do if you’ve dived in and have a whole slew of notebooks that are your backbone of your data integration and analytics efforts and are struggling with the development experience? Do not despair! It doesn’t have to descend into a frustrating, opaque, unmanageable quagmire of notebook nastiness. It’s generally not difficult to convert the notebook code to scripts. You can automate the exporting of your notebooks’ source code from workspaces using the databricks CLI workspace export_dir command. This will recursively export the notebooks within the specified folder, into .py, .scala, .sql or .r files based on the notebook language of choice.
# export all files recursively to the destination folder.
databricks workspace export_dir /Shared/lib1 D:\tmp\shared\lib1
You will find certain cells using magics will need to be revisited, but if most of your code is based on the various Spark APIs this won’t play a big part.
From my experience of having worked on projects that are notebooks-based/heavy and on projects that are more IDE based, for me the IDE approach for data engineering is the way to go. When it comes to crafting code, a good ‘fat client’ IDE running on your workstation will make a massive difference, with all the responsiveness and functionality you need right there at your fingertips. Of course this is just my opinion on the matter.
We’ll be going through some of the most common aspects of developing on databricks throughout this series, so that you can see for yourself how to really get to grips with working on this fantastic platform. I hope this post has been of some use in deciding whether to opt for the IDE or remain with notebook-based development for your particular situation.
Thanks for reading and see you in the next post on Development on Databricks.

The option of setting up a local spark environment on a Windows build, whether for developing spark applications, running CI/CD activities or whatever, brings many benefits for productivity and cost reduction. For this to happen however, you’ll need to have an executable file called winutils.exe. This post serves to supplement the main thread of the series on Development on Databricks, making a stop at C++ world (don’t panic!) as we handle the situation where you are required to build your own WinUtils executable for use with Spark. It is intended for an audience unfamiliar with building C++ projects, and as such seasoned C++ developers will no doubt want to skip some of the ‘hand-holding’ steps.
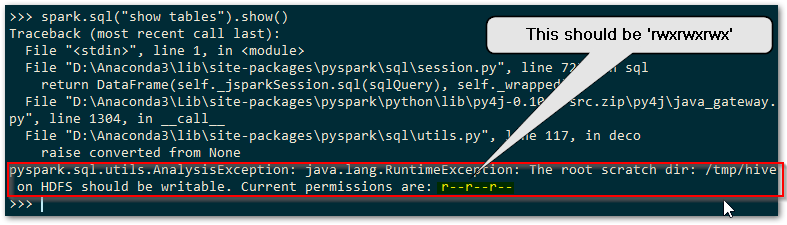
In order to run Apache Spark locally, it is required to use an element of the Hadoop code base known as ‘WinUtils’. This allows management of the POSIX file system permissions that the HDFS file system requires of the local file system. If Spark cannot find the required service executable, WinUtils.exe, it will throw a warning as below, but will proceed to try and run the Spark shell.

Spark requires that you have set POSIX compatible permissions for a temporary directory used by the Hive metastore, which defaults to C:\tmp\hive (the location of this can be changed as described here ). In order to set these POSIX permissions you need to use WinUtils, and without these permissions being set correctly any attempt to use Spark SQL to access the Hive metastore will fail. You’ll get an error complaining about lack of writable access to the above scratch directory and Spark will throw a full blown sulk like a kid deprived of their Nintendo Switch. Here’s a sulk it threw earlier…
You’ll need to use WinUtils as below in order to set the POSIX permissions for HDFS that the Hive metastore will be happy with.
# set the rwxrwxrwx POSIX permissions
winutils chmod -R 777 c:\tmp\hive
So if you’re on Windows and want to run Spark, WinUtils is a necessity to get going with anything involving the Hive metastore.
There are GitHub repositories that are independently maintained, available here, with a previous one here (no longer maintained) that contains the compiled exe file and any supporting libraries, for the various versions of the Hadoop code base included within Apache Spark. If you don’t need to provide transparency of the source of the code used you can always simply grab the compiled files for local use rather than going to the trouble of compiling your own.
The maintainer of the second compiled WinUtils repo above details the process that they go to in order to ensure that the code is compiled from the legitimate source, with no routes for malware to infiltrate. This may however still not be acceptable from a security perspective. The security administrators and custodians of your systems will quite probably have tight controls on you simply copying files whose originating source code cannot be verified 100%, for obvious reasons. We all know the perils of simply downloading and running opaque executables and so the option to build your own winutils executable for Spark will be welcome.
WinUtils is included within the main Apache Spark GitHub repository, with all dependent source code available for inspection as required. As you can see from the repo, the Hadoop code base is huge, but the elements we really need are only a small fraction of this. Getting the whole Hadoop code base to build on a Windows machine is no easy task, and we won’t be trying this here. You’ll need a very specific set of dependent components and a dedicated build machine if you want to build the full Hadoop repo, which is the approach taken in the above prebuilt repos. You can find a number of tutorials on how to do this on the web, such as the one found here. Note the specific components required based on the code base. For our purposes we can focus on just the WinUtils code itself. I’ll be using the ‘branch-3.2’ branch for this exercise.
So having cloned/downloaded the Apache Hadoop repo and checked out to the ‘branch-3.2’, the desired WinUtils code can be found within our local repo at
hadoop-trunk\hadoop-common-project\hadoop-common\src\main\winutils
and
hadoop-trunk\hadoop-common-project\hadoop-common\src\main\native
You’ll notice that the above code is written in C/C++, and so if we’re going to build the executable we need to be able to compile C/C++ code. No great surprises there. I should probably confess at this point that I haven’t touched C++ for a good few years to any advanced degree, so I’m far removed from being a C++ developer these days and am going to simplify things here (to avoid confusing me and possibly you).
If you have Visual Studio installed you can simply extend the Features to include C++ desktop applications, thereby gaining the required compiler, linker etc. If you don’t have Visual Studio, you can still get the Build Tools as a separate download, available here for VS2019. Once you have the required tools, we can look at what is required to build your own WinUtils executable.
Cue trumpets… pap pap pap pap paaaaeeeerrrrr…. oh hold on, there’s still a little way to go. Trumpets, come back in a bit, grab a coffee, play some Uno or something, won’t be long, nearly there.
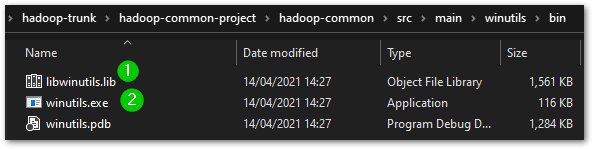
In the latest version of the WinUtils code, there are two projects in the WinUtils directory. One is for the WinUtils.exe used directly from Spark on Windows, and the other is for a library, libwinutils.lib, that will be referenced from WinUtils.exe. If you look at the precompiled repos mentioned above, for each version of Hadoop you’ll see a number of files that are output in addition to the two previously mentioned. We’ll be needing the hadoop.dll and hadoop.lib files for our purposes of running Spark on Windows. We don’t need the hdfs.*, mapred.* or yarn.* files as these components of Hadoop won’t be of interest.
We want to be able to compile both the winutils, libwinutils and native projects and make use of the resultant files. If you are not familiar with building code using Microsoft Visual Studio and associated tooling, these files will be generated in a default output location such as winutils\debug or winutils\Release, depending on the configuration chosen (more on that below). Okay, with that end goal in mind, let’s look to building the code.
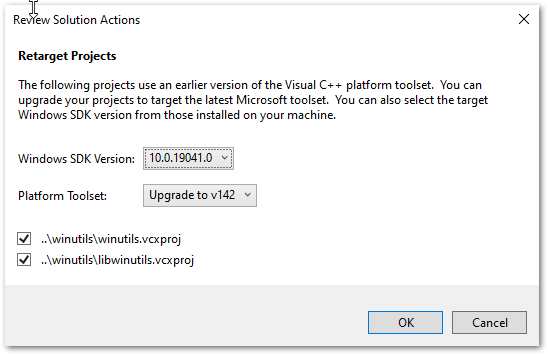
The projects are based on the VS2010 IDE, so you’ll get upgrade messages when opening if you are on a later version.
Assuming you are on a later Windows build than Windows 8.1, you will need to change the Build tools and Windows SDK targeted by the solution projects. The first time you open the winutils.sln or native.sln files you will be greeted with the following dialogue and should choose whatever is the latest installed on your system. For me this was v142 as I’m on Visual Studio 2019, and SDK 10.0.19041.0.
Okay, so we’ve grabbed the code base and installed the required tools to build the code. There are a couple of things that need to be considered for a successful build of your own WinUtils for Spark.
You’ll see the following errors in the libwinutils.c source file, which imply an issue with the code.

However, the issue is actually with the lack of values for the preprocessor directives WSCE_CONFIG_DIR and WSCE_CONFIG_FILE.
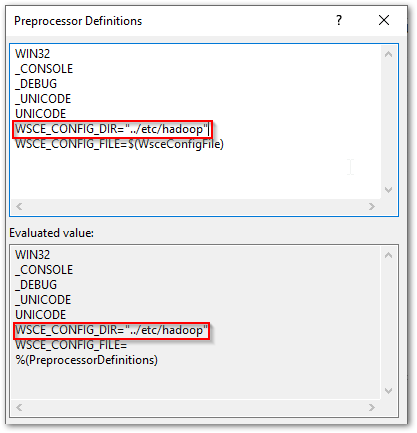
The preprocessor directives WSCE_CONFIG_DIR and WSCE_CONFIG_FILE can be seen defined within the winutils and libwinutils projects, as the project file excerpt below shows.

Notice that they are populated from parameters passed in to the build, as denoted by the WSCE_CONFIG_DIR=$(WsceConfigDir) syntax. So when building the winutils project it expects these values to be passed in. Right, time to find what values are used in the Hadoop code base to see the relevance of this…
In order to understand what parameters are required to be passed to the build, we need to take a look at the Maven pom file that is used to build this part of the code base, found at
\hadoop-trunk\hadoop-common-project\hadoop-common\pom.xml
Firstly, at the top of the file, we see the following properties defined:


The various parameters passed define the configuration, platform, output directories etc, and also the two expected values, WsceConfigDir, and WsceConfigFile that will feed the preprocessor directives mentioned. These are taken from the property references ${wsce.config.dir} and ${wsce.config.file} respectively. The values for these are supplied, as we’ve just seen, in the property definitions at the top of the pom file. Right, glad we cleared that one up.
For context, these values are used as part of the Yarn Secure Containers setup, which you can read about here. We’ll need to ensure that these values are passed in for each of our build methods detailed below. As we won’t actually be using the Yarn elements for our purposes of running local Spark, we don’t need to concern ourselves with the directory and file in question not being available. We can pass empty strings, “”, for each if we want, use the values from the pom file, or use other string values. I’m going to stick with the pom file values for this exercise.
The code within the hadoop-trunk\hadoop-common-project\hadoop-common\src\main\native folder that creates the hadoop.dll and hadoop.lib files requires no amendment and should compile without issue.
On the winutils Poject Properties dialogue, choose your required Configuration. In the Configuration Properties | C/C++ | Preprocessor | Preprocessor Definitions select ‘Edit…’ to amend the values, as shown below:

You’ll see the evaluated values in the second box. I’ve edited one below to show this taking effect. Notice that WSCE_CONFIG_FILE is still undefined as far as Visual Studio is concerned. This will also need to have a value as well as mentioned above.
Do the same for the libwinutils project.
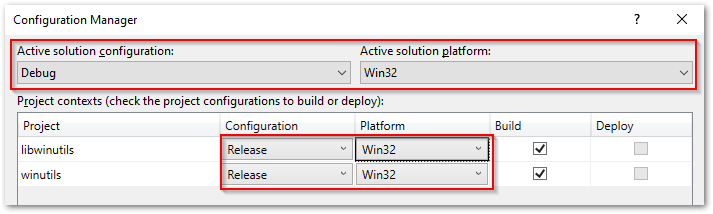
By default, the original projects are configured to build against the x86 Windows platform. If you try and build using this on a x64 Windows machine, you will probably encounter the error below.

This can throw you off the scent a little as to the real issue here. You have the build tools installed as part of the Visual Studio setup for C++ projects, so why all the belly aching? Well, you’ll need to change the project configurations to build vs x64, as the build tools you have installed will be for this architecture.
If you are on x64 Windows, be sure to change the project configurations so that they build against the x64 rather than x86 platform, to avoid the issue mentioned above. This is done from Build | Configuration Manager… as shown below:
Right-click the solution and action ‘Build Solution’, or use Ctrl+Shift+B, and this will build first the libwinutils project (a dependency of winutils) and then the winutils project, to the output directories expected for your configuration.
Opening up a ‘Developer Command Prompt for Visual Studio’, you’ll have access to MSBuild from the command line. If you have added the path to MSBuild.exe to your ‘Path’ environment variable you will have access to this also from a regular command prompt. Navigate to your winutils solution directory.
As with the Visual Studio method, you’ll need to specify the correct platform if you are on x64, as it will default to an x86 build. Otherwise, you’ll get the same error as shown in the Visual Studio section above regarding missing build tools. It would be nice if MSBuild defaulted to use the same platform as the tooling for your installation. A simple parameter addition is all that is required to sort this.
In addition, add the parameters as defined in the Maven pom file , resulting in the MSBuild command as below:
rem output for the build will be to the winutils\bin directory
MSBuild winutils.sln /nologo /p:Configuration=Release /p:Platform=x64 /p:OutDir=bin\ /p:IntermediateOutputPath=\Winutils\ /p:WsceCOnfigDir="../etc/config" /p:WsceConfigFile="wsce-site.xml"
Execute this from the winutils solution directory to ensure the relative paths are as desired. You outputs will be built and output to the winutils\bin directory specified.
As mentioned, there are no code amendments required for the native.sln file that creates hadoop.dll and hadoop.lib. You will however need to change the configuration to x64 as necessary, as per ‘Issues Building on x64 Windows’ above. Once that is done, right-click the solution and action ‘Build Solution’, or use Ctrl+Shift+B and your code will be output to the respective debug or release folders.
Follow the above ‘Building the WinUtils Solution with MSBuild’, navigating instead to the native solution directory and substituting the following MSBuild command.
rem output for the build will be to the native\bin directory
MSBuild native.sln /nologo /p:Configuration=Release /p:Platform=x64 /p:OutDir=bin\ /p:IntermediateOutputPath=\native\"
You outputs will be built and output to the native\bin directory specified.
Well technically not really ‘ours’, as those nice dedicated Hadoop developers did all the real work, but anyway. So now you have a build of your own winutils.exe, libwinutils.lib, hadoop.dll and hadoop.lib files for winutils from known source code. This ticks those security checkboxes nicely. Bring the trumpeters back in…yay! Oh, they’ve gone home, never mind, improvise. Woop woop, papapapapa etc. etc. Take a bow.
In order for Spark to use the WinUtils executable, you should create a local directory with a ‘\bin’ subdirectory as suggested below:
D:\Hadoop\winutils\bin
Copy the winutils.exe, libwinutils.lib, hadoop.dll and hadoop.lib files files generated earlier to this destination.
You then need to add an environment variable ‘HADOOP_HOME’ for Spark to understand where to find the required Hadoop files. You can do this using the following powershell:
# Setting HADOOP_HOME System Environment Variable
[System.Environment]::SetEnvironmentVariable('HADOOP_HOME', 'D:\Hadoop\winutils', [System.EnvironmentVariableTarget]::Machine)
Note: This needs to be the name of the parent of the bin directory, with no trailing backslash.
As environment variables are initialised on startup of terminals, IDEs etc, any that are already open will need to be reopened in order to pick up our ‘HADOOP_HOME’.
We’ll also need to add the path to the bin directory to our Path variable, if we want to invoke ‘winutils’ from the command line without using the full path to the .exe file.
# Append winutils.exe folder location to the System Path
[System.Environment]::SetEnvironmentVariable('Path', "${env:Path};D:\Hadoop\winutils\bin;", [System.EnvironmentVariableTarget]::Machine)
With that done we are all set to use this with our local Spark installation.
Something of a diversion from the general world of data analytics this time, but for those who need to run Spark on Windows with no awkward questions about where that exe came from, this article should be of benefit. In the next post in this series we’ll look at setting up Spark locally, something that is not half as scary as it sounds. It is also at least twice as useful as you might initially think, maybe even three times. Till next time.

This post sets out steps required to get your local development environment setup on Windows for databricks. It includes setup for both Python and Scala development requirements. The intention is to allow you to carry out development at least up to the point of unit testing your code. Local databricks development offers a number of obvious advantages. With Windows being a popular O/S for organisations’ development desktops it makes sense to consider this setup. Considerations for cost reduction, developing offline, and, at least for minimal datasets, faster development workflow as network round-tripping is removed, all help. Right, with that said, let’s take a look at what we need to get started. I’ll split things into core requirements, just Python, just Scala, and Python and Scala, to cover off the main development scenarios. Apologies in advance to R users as not being an R user I won’t be covering this.
This is a component of the Hadoop code base that is used for certain Windows file system operations and is needed for Spark to run on Windows. You can read about how to compile your own version from the Hadoop code base, or acquire a precompiled version, in my post on the subject here. I’ll skip to the point where you have the compiled code, either from downloading from GitHub precompiled, or by compiling from source.
Spark can be built against various versions of Hadoop, and adopts a naming convention in its tar or zip archive that includes both the Spark version and Hadoop version, ‘Spark-<spark-version>-<bin/src>-hadoop<hadoop-version>.tgz‘, e.g. Spark-3.1.2-bin-hadoop3.2.tgz. If you are planning on using the PySpark python package for development you will need to use the version of Hadoop that is included.
On non-windows environments you can choose which version of Hadoop to include with your PySpark by setting the PYSPARK_HADOOP_VERSION environment variable prior to calling ‘pip install pyspark=<version>’, however this doesn’t appear to work for Windows, forcing you to use the default version of Hadoop for the package. For PySpark 3.1.2, this is Hadoop 3.2. For those interested, further information on hadoop version-specific installs of PySpark on non-windows systems is available at https://spark.apache.org/docs/latest/api/python/getting_started/install.html.
As we’re on Windows, we’ll go with our PySpark 3.1.2. and Hadoop 3.2, which means we need WinUtils from the Hadoop 3.2 build.
Simply copy this to a local folder, e.g. D:\Hadoop\WinUtils, and make a note of the ‘\bin‘ subdirectory which contains the winutils.exe file.
If you’ve built your own winutils.exe, you’ll need to create a \bin directory to house, e.g. D:\Hadoop\WinUtils\bin and copy winutils.exe, libwinutils.lib, hadoop.dll and hadoop.lib files here.
You then need to add an environment variable ‘HADOOP_HOME‘ for Spark to understand where to find the required Hadoop files. You can do this using the following powershell:
# Setting HADOOP_HOME System Environment Variable
[System.Environment]::SetEnvironmentVariable('HADOOP_HOME', 'D:\Hadoop\winutils', [System.EnvironmentVariableTarget]::Machine)
Note: This needs to be the name of the parent of the bin directory, with no trailing backslash.
As environment variables are initialised on startup of terminals, IDEs etc, any that are already open will need to be reopened in order to pick up our ‘HADOOP_HOME‘.
We’ll also need to add the path to the bin directory to our Path variable, if we want to invoke ‘winutils’ from the command line without using the full path to the .exe file. The following is based on a path of D:\Hadoop\winutils\bin for our winutils.exe.
# Append winutils.exe folder location to the System Path
[System.Environment]::SetEnvironmentVariable('Path', "${env:Path};D:\Hadoop\winutils\bin;", [System.EnvironmentVariableTarget]::Machine)
Spark requires Java 1.8 to run. It won’t run with later versions, so we need to be specific here. You can download either the Oracle SE JDK here, or the OpenJDK here. Please note the change in the licencing agreement if opting for Oracle SE and using in commercial development.
Run the installer, following the desired options and make a note of your installation path.
This should have been set by the installer and will point to the root of your JDK installation.
This will make the various executables within the JDK accessible without requiring an explicit path, something of use for any future Java development. It is not required for our Spark installation purposes but I’ve included this for completeness here should you want to use these.
# Append winutils.exe folder location to the System Path
[System.Environment]::SetEnvironmentVariable('Path', "${env:Path};D:\Java\jdk1.8.0_191\bin;", [System.EnvironmentVariableTarget]::Machine)
Okay, that’s us done with the core requirements parts. Now onto the development scenario specifics.
This is my preferred option for getting Python setup for data development. Local databricks development can involve using all manner of python libraries alongside Spark. Anaconda makes managing Python environments straight forward and comes with a wide selection of packages in common use for data projects already included, saving you having to install these. You can run Spark without this if you prefer, you’ll just have to download Python (recommended 3.7 but min. 3.5 for Windows) and configure environments using the Python native tools for this, none of which is particularly difficult. I won’t cover that approach here as this is easily done with the help of a quick Google search.
You can download Anaconda for Windows here.
It may make sense to create a separate environment for your Spark development. You can if you prefer simply use the ‘base’ environment, else you can create your own via either the Anaconda prompt or the Anaconda Navigator. Both are well documented and so again I won’t be detailing here. I’ve created a ‘pyspark’ environment for this purpose. If you do create a new environment make sure that you activate this for any Python steps that follow. This is something often missed if you are not familiar with working with Python environments.
Using either the Anaconda prompt or Anaconda Navigator install the pyspark package. Due to a compatibility issue with the latest delta.io code and Spark 3.1, if you are intending on using databricks Delta (see below), the latest version you can specify is version 3.0.0 rather than the current 3.1.1 version. This issue exists only with the OSS version of the Delta code base and not with the databricks commercial offering.
Note: The pyspark package includes all required binaries and scripts for running Spark (except the WinUtils files noted above required for Windows). It is not required to download Spark separately for local databricks development if using pyspark.
If you have no Python installation and want to develop using only Scala, then you will need to take a slightly different approach to running Spark.
Note: Before considering Scala only, if you are planning on using Databricks Connect be aware that you will need to have Python installed, so your better option will probably be as outlined in the ‘Python and Scala Development’ section below.
Without pyspark installed, for local databricks development you’ll need to download the required Spark binaries, which can be done here. You can choose either the download with or that without Hadoop for our purposes, either is fine. The main difference between these is the inclusion of about 70MB of additional jars in the \jars directory for the Hadoop download. Extract these to a directory of your choosing such as D:\Spark. We’ll need to add some environment variables as below, so for now make a note of the directory chosen and we’re done for now.
We won’t cover how to setup the Scala environment itself. You can find details here for the Intellij IDE, or here for VSCode, which uses the ‘Metals’ language server. You can also simply install the Scala binaries, the latest version of which are available here, and then use the command line. You can find instructions here if required.
If you are developing in both Python and Scala, not uncommon if you have both ‘Data Engineer’ and ‘Data Scientist’ aspects to your work, you will not need all the steps outlined above for ‘Scala-Only Development’. Follow the Python-Only steps, which will install Spark via the pyspark Python package, and then simply setup your development environment as mentioned in the ‘Scala-Only Development – Scala Development Environment’ section above.
Depending on whether you have used the pyspark Python package to provide the Spark binaries for your local databricks development, or whether you have downloaded Spark separately, you will need to amend the following based on the destination of your files.
This should be set to the root of the Spark files. For pyspark, you will find the package installed to either <PathToAnaconda>\Lib\site-packages\pyspark, e.g. D:\Anaconda3\Lib\site-packages\pyspark, if you are using the ‘base’ environment, or if you have created your own environment you’ll find the default path at <PathToAnaconda>\Envs\<EnvName>\Lib\site-packages\pyspark. Amend the following powershell accordingly.
# Setting HADOOP_HOME System Environment Variable
[System.Environment]::SetEnvironmentVariable('SPARK_HOME', 'D:\Anaconda3\envs\pyspark\Lib\site-packages\pyspark', [System.EnvironmentVariableTarget]::Machine)
The following will need to be added to your path in order to run the various Spark commands from the command line:
%SPARK_HOME%\bin
%SPARK_HOME%\sbin
Here’s some powershell I made earlier…
# Append required pyspark paths to the System Path
[System.Environment]::SetEnvironmentVariable('Path', "${env:Path};${env:SPARK_HOME}\bin;${env:SPARK_HOME}\sbin;", [System.EnvironmentVariableTarget]::Machine)
The databricks Delta libraries for Spark add some fantastic functionality to Spark SQL and are very much revolutionising data lakes and data warehousing with their ‘LakeHouse‘ architecture. You can read all about Delta here. Suffice to say that these libraries will probably feature in your local databricks development.
Note that there are actually two different development streams for Delta. One is that used on the commercial databricks service, The other is that made Open Source at the previous link, which we’ll be using. I’ll refer to this as Delta OSS to avoid confusion.
Unfortunately there is an issue with using Delta OSS 0.8.0 with Spark 3.1. The setting of the Spark configuration ‘spark.sql.catalog.spark_catalog‘ to ‘org.apache.spark.sql.delta.catalog.DeltaCatalog‘ will result in an error that prevents using Delta. Some users have suggested simply omitting setting this configuration value, however this then causes further headaches when working with delta tables. You’ll get errors relating to the table metadata, such as ‘Cannot write nullable values to non-null column <colName>‘, and errors trying to cast values to dates and all sorts of other woes. These errors only really hint at what might be up, which appears to be the lack of the DeltaCatalog required for correct table metadata storage. The only real solution is to use Spark 3.0 with Delta OSS, which for local development should not be an issue. I’m told this issue should be resolved in Spark 3.2. As previously mentioned, there is no issue with the commercial offering available on the databricks platform, only with the Delta OSS code.
You can read the quickstart guide at delta.io here to see how we can use the Delta libraries for the various ways of working locally you may have adopted. I’ll include the Python and Scala ones here for completeness.
With the version 1.0.0 release of Delta OSS we now have a PyPI package available. This is great news. We can now use pip to install the package as below:
pip install delta-spark=1.0.0
This will install the Python wrappers for Delta OSS but will not include the related Scala jar files that are the core of the code base. The jars will be fetched at runtime as described below:
Add the following code to your Spark session configuration
spark = pyspark.sql.SparkSession.builder.appName("MyApp") \
    .config("spark.jars.packages", "io.delta:delta-core_2.12:0.8.0") \
    .config("spark.sql.extensions", "io.delta.sql.DeltaSparkSessionExtension") \
    .config("spark.sql.catalog.spark_catalog", "org.apache.spark.sql.delta.catalog.DeltaCatalog") \
    .getOrCreate()

from delta.tables import *
The ‘spark.jars.packages‘ link will cause the jar files to be downloaded from Maven and stored in your local Ivy package store, the default location being .ivy2\jars within your user home directory.
If you open up the io.delta_delta-core_2.12-0.8.0.jar archive file (any zip program should do) you will see that there is also a Python file included, delta\tables.py.

This contains the python code for interfacing with the underlying Scala implementation. With the jar added to your Spark session you are then able to import the Python module ‘delta\tables.py‘ and add Delta table functionality to your efforts.
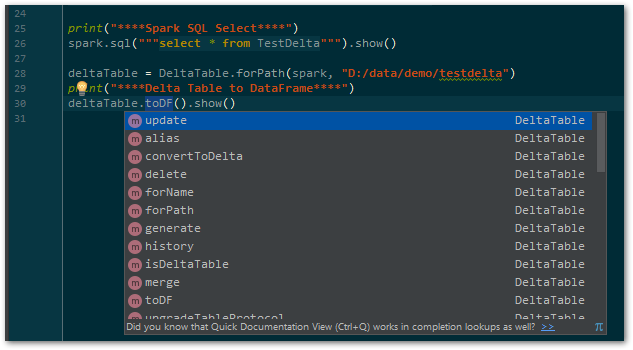
Pycharm won’t recognise the tables.py file that is contained in the jar, as it is only visible to Spark at runtime. The delta code base is not available as a Python package and so cannot be ‘installed’ to Python and easily recognised by PyCharm. In order to have fully functional code completion you will need to download the source code and add the required path to the project structure as a ‘Content Root’ so that it is visible. You can download the required release for your local databricks development from GitHub here. Unzip it to a suitable location locally and within PyCharm, in File | Settings | Project: <projectName> | Project Structure, add the python\delta folder as a ‘Content Root’ as shown below.

By using the above ‘from delta.tables import *‘ you will then have Delta code completion within your PyCharm environment.
With the release of the PyPI package for delta-spark, we have none of the above hoops to jump through to get our Delta OSS code working in Python. As it is available in our virtual environment, we can simply import the required modules and code completion/Linting will be available to our IDE. Happy days. We do however still need to acquire the Scala library and enable the required functionality. The Spark Session configuration is very similar to that for Delta OSS 0.8.0 above, with the added bonus of a handy utility function ‘configure_spark_with_delta_pip’ to ensure that we grab the correct Scala jar file without hard coding the version. Pass in your configured Spark Session Builder object, and this will add the ‘spark.jars.packages‘ configuration value for the required jar that we had to add ourselves in 0.8.0.
# delta-spark 1.0.0 brings a handy configuration function for acquiring the Scala jars...
spark = configure_spark_with_delta_pip(
    pyspark.sql.SparkSession.builder.appName("MyApp")
    .config("spark.sql.extensions", "io.delta.sql.DeltaSparkSessionExtension")
    .config("spark.sql.catalog.spark_catalog", "org.apache.spark.sql.delta.catalog.DeltaCatalog")
    ).getOrCreate()

from delta.tables import *
Add the jar file to PySpark
If you are using the PySpark package to provide your local Spark code base, as opposed to downloading the Spark code and installing to a local directory, you’ll need to add the required delta-core jar file to your PySpark\jars folder. Simply copy this from the .ivy location above and you’re done.
Add the following to your Maven pom file:
<dependency>
  <groupId>io.delta</groupId>
  <artifactId>delta-core_2.12</artifactId>
  <version>0.8.0</version>
</dependency>
Note: Change your version accordingly to whatever version of Delta OSS you are using.
If using SBT, you can simply add the following to your build.sbt file:
libraryDependencies += "io.delta" %% "delta-core" % "0.8.0"
Note: Change your version accordingly to whatever version of Delta OSS you are using.
You now have Delta functionality within your locally developed Spark code. Smokin’…
We now have our local databricks development environment setup on Windows to allow coding against Spark and Delta. This won’t necessarily serve all your needs, with aspects like integration testing probably falling out of scope. It should however remove the need to always have clusters up, reduce disruption that would be caused on a shared development environment, as well as increasing productivity during development. Personally I find it well worth setting up and hope you will find considerable benefits from this way of working.
In the next post we’ll be looking at hooking up databricks connect with your local dev tools for when you need to run against a databricks cluster. Thanks for reading and see you soon.

In this post we’ll be looking at using our local development environment, with the various productivity benefits from IDE tools, with a Databricks cluster. We’ve covered how to use a local Spark setup, with various benefits such as cost savings and isolated working, but this will only take you so far. You might be in need of collaborative development/testing or are at the point where you simply need the power of a databricks cluster. Whatever the motivation, being able to hook your development workstation in to the databricks service is something you’ll want to consider at some point.
As the name suggests, this allows local connection to a databricks cluster, allowing you to issue actions against your databricks environment. To connect your favourite local development tools to your databricks cluster, you’ll need to use the ‘databricks-connect‘ python package. Before we get too giddy at this prospect there are however a number of caveats to be aware of.
A prerequisite of working with databricks connect against your cluster is that the cluster runtime major, minor versions match the databricks connect package major, minor version. Not all versions of the runtime are supported, which is something of a pain and does leave the tail wagging the dog in this regard. In essence, the availability of the databricks connect packages will dictate the runtime version of databricks that you choose for your development cluster. You are of course free to use a later version beyond the development environment as you won’t need databricks connect outside of this, but that does add a small element of risk regarding the disparity of runtime versions between environments.
At the time of writing, if you are going to use databricks connect, you essentially have databricks runtimes 7.3 and 8.1 to choose from (unless you stretch back to versions well out of support). If you’d like to further information on the versioning aspects, please take a look at https://docs.databricks.com/release-notes/dbconnect/index.html.
As you’re probably going to opt for runtime 8.1, be aware that Scala developers will need to install Scala version 2.12 for local development against the cluster.
Okay now we’ve got all the caveats around versioning out of the way, we can crack on.
You can find the guide for setting up your client machines and Azure databricks workspace clusters for databricks connect at https://docs.microsoft.com/en-us/azure/databricks/dev-tools/databricks-connect. If you’ve been running Spark locally, you will need to change your PYSPARK_PYTHON and SPARK_HOME environment variables whilst using databricks connect, as mentioned in the article.
If you are using PyCharm, you can set environment variables for each of your configurations. Go to Run | Edit Configurations… and then for the relevant configuration, amend your PYSPARK_PYTHON and SPARK_HOME variables as required as shown below.

You can easily copy the environment variables from one configuration to another using the UI.
Note: The use of other existing environment variables in the value, such as with %MY_ENV_VAR% syntax usual for embedding variables within other variable values appears to not work in PyCharm. I haven’t pursued this one and tend to take the longer way round of copying the full variable value where otherwise I would have embedded it. For our variables above this is not an issue, but something to note if you were for example using %SPARK_HOME% in you Path variable value.
Before you start your local development setup with databricks connect, ensure you read the Limitations section. Two important development areas that are not supported are worth highlighting here.
The docs state that all Delta API calls are not supported, but I’ve found that some do work, such as DeltaTable.isDeltaTable, whereas DeltaTable.forPath and DeltaTable.forName do not. Also, using spark.sql(“””Create table….. using delta…”””) won’t work (contrary to the docs), complaining of not being able to instantiate a DeltaDataSource Provider. You can however still read and write data to delta tables using spark.read and spark.write.format(“delta”).save(“path/to/delta_table”).
Having this disparity between APIs available may result in you deciding to take a different approach to development that doesn’t include databricks connect when using delta lake. I tend to work locally on these aspects of the development, to the point where I’m happy to push up as jars or wheels for executing directly on the cluster.
Okay, if you’re fine with those limitations then there is one additional piece of info required for us to get started with local development using a databricks cluster.
The above setup guide does neglect to include a a Spark configuration value for your cluster relating to the databricks service port . With this added, the required list of cluster configuration settings is as below:
spark.databricks.service.port 8787
spark.databricks.service.server.enabled true
Add this to your Cluster via the ‘Advanced Options | Spark | Spark Config’ section and your cluster is all databricks connect friendly and ready to receive.
It makes a lot of sense to create a separate Python environment for your databricks connect package, and you’ll probably want to keep this separate from any ‘native’ PySpark installation you may already have, such as if working locally as per the previous post Local Databricks Development on Windows.
The databricks connect package uses a file in your home directory called ‘.databricks-connect‘ in order to connect to your cluster. If you are using multiple clusters for different aspects of your work you could swap various files in and out in order to manage your cluster connections. This would be pretty messy and error prone and hard to coordinate. A much better approach is to simply change the spark.configuration settings that are used for the cluster connections. Credit for this idea goes to to Ivan G in his post at https://dev.to/aloneguid/tips-and-tricks-for-using-python-with-databricks-connect-593k. We’ll cover this in the next section.
We basically have three scenarios to consider when executing our Spark code for databricks.
Our spark session will be setup differently for each of these scenarios, and it makes sense to have a way of determining programmatically which of these is relevant. There are a number of configuration settings and environment elements that we can examine to deduce this, as outlined below:
I should add that these are current determinants, and that you should ensure that you test that these still hold with each change in databricks runtimes and the related databricks-connect package release.
With those conditions to work with, I have created a ‘SparkSessionUtil‘ class that configures our required Spark Session for us.
For local Spark installations we can turn off a number of settings that don’t apply if we are not on a cluster (there are probably more but these should be a good set to run with).
We can pass a cluster id for when working with databricks connect and wanting to use a cluster different to that set in our ‘databricks-connect‘ configuration file.
If we are executing directly on our cluster (scenario 3 above) we don’t need to do anything with our Spark Session so simply return the original session.
Right, finally, some code.
import os
from pyspark import SparkConf, SparkContext
from pyspark.sql import SparkSession


class SparkSessionUtil:
    """
    Helper class for configuring Spark session based on the spark environment being used.
    Determines whether are using local spark, databricks-connect or directly executing on a cluster and sets up config
    settings for local spark as required.
    """

    DATABRICKS_SERVICE_PORT = "8787"

    @staticmethod
    def get_configured_spark_session(cluster_id=None):
        """
        Determines the execution environment and returns a spark session configured for either local or cluster usage
        accordingly
        :param cluster_id: a cluster_id to connect to if using databricks-connect
        :return: a configured spark session
        """
        spark = SparkSession.builder.getOrCreate()
        if SparkSessionUtil.is_cluster_direct_exec(spark):
            # simply return the existing spark session
            return spark
        conf = SparkConf()
        # copy all the configuration values from the current Spark Context
        for (k, v) in spark.sparkContext.getConf().getAll():
            conf.set(k, v)
        if SparkSessionUtil.is_databricks_connect(spark):
            # set the cluster for execution as required
            # note: we are unable to check whether the cluster_id has changed as this setting is unset at this point
            if cluster_id:
                conf.set("spark.databricks.service.clusterId", cluster_id)
                conf.set("spark.databricks.service.port", DATABRICKS_SERVICE_PORT)
                # stop the spark session context in order to create a new one with the required cluster_id, else we
                # will still use the current cluster_id for execution
                spark.stop()
                con = SparkContext(conf=conf)
                sess = SparkSession(con)
                return sess.builder.config(conf=conf).getOrCreate()
        else:
            # set up for local spark installation
            conf.set("spark.broadcast.compress", "false")
            conf.set("spark.shuffle.compress", "false")
            conf.set("spark.shuffle.spill.compress", "false")
            conf.set("spark.master", "local[*]")
            return SparkSession.builder.config(conf=conf).getOrCreate()

    @staticmethod
    def is_databricks_connect(spark):
        """
        Determines whether the spark session is using databricks-connect, based on the existence of a 'databricks'
        directory within the SPARK_HOME directory
        :param spark: the spark session
        :return: True if using databricks-connect to connect to a cluster, else False
        """
        return os.path.isdir(os.path.join(os.environ.get('SPARK_HOME'), 'databricks'))

    @staticmethod
    def is_cluster_direct_exec(spark):
        """
        Determines whether executing directly on cluster, based on the existence of the clusterName configuration
        setting
        :param conf: the spark session configuration
        :return: True if executing directly on a cluster, else False
        """
        # Note: using spark.conf.get(...) will cause the cluster to start, whereas spark.sparkContext.getConf().get does
        # not. As we may want to change the clusterid when using databricks-connect we don't want to start the wrong
        # cluster prematurely.
        return spark.sparkContext.getConf().get("spark.databricks.clusterUsageTags.clusterName", None) != None


# specify a cluster_id if needing to change from the databricks connect configured cluster
spark = SparkSessionUtil.get_configured_spark_session(cluster_id="nnnn-mmmmmm-qqqqxx")
Okay, assuming you’ve followed the setup guide at https://docs.microsoft.com/en-us/azure/databricks/dev-tools/databricks-connect, and added the omission around configuration, you should now be good to go. Go forth and develop locally whilst running your code either against your local Spark installation or your amped up, supercharged, megalomaniacal databricks clusters. Can I get a ‘Woop Woop’? No? Oh well, worth a try…
One common issue when using libraries in your development that are still somewhat ‘volatile’ is that updating these on the cluster will cause issues for other users. You may be working on elements of the development that use a library version that is different to that used by a colleague, such as when referencing inhouse libraries that are still evolving.
Databricks uses three scopes for library installation, as summarised below:
These are available across the databricks workspace, and can be referenced when installing onto clusters as required. Please see https://docs.microsoft.com/en-us/azure/databricks/libraries/workspace-libraries for more information.
These have been installed on a cluster and can be referenced from any code running on the cluster. Please see https://docs.microsoft.com/en-us/azure/databricks/libraries/cluster-libraries for more information. The big gotcha with these is the need to restart the cluster if you need to change the library code. This is a disruption most dev teams could do without and you won’t be popular if your libraries are in a state of rapid flux.
These are available within a single notebook, allowing the best isolation from other users’ code and the least disruption. You can read more about them at https://docs.microsoft.com/en-us/azure/databricks/libraries/notebooks-python-libraries. One pain with using %pip for dbfs-located packages results from databricks changing periods, hyphens and spaces with underscores. You will need to first rename the file back to the correct name to conform to the wheel package naming standards, in order to use %pip from the notebook.
If you’re not doing notebook-based development, for whatever reason, then the option of upsetting your colleagues by using cluster libraries may not sit well. You can however add the required packages for local development using databricks by adding a reference to the egg/jar to the SparkContext, using either ‘addPyFile‘ (Python) or ‘addJar‘ (Scala). This is mentioned in the databricks connect setup article at https://docs.microsoft.com/en-us/azure/databricks/dev-tools/databricks-connect. First add your files to a file share somewhere accessible to your workspace clusters, such as a storage mount point, or the dbfs:/FileStore.
The only scenario we really need to consider volatile libraries issues is when you are using databricks connect to execute against a cluster (scenario 2 above). The local Spark installation approach (scenario 1 above) is by its nature not shared, so we’re free to use whatever there. We can usually assume that if you are executing directly on a cluster (scenario 3 above) that you have installed the required libraries on the cluster and as such the packages will be available.
Here’s some code for using our own library versions.
Python
if SparkSessionUtil.is_databricks_connect(spark):
    spark.sparkContext.addPyFile("dbfs:/FileStore/jars/lib1-0.3-py3.8.egg")
    # insert additional libraries here...

from lib1 import mod1._

some_blah = mod1.some_method('blah')
if SparkSessionUtil.IsDatabricksConnect(spark){
    spark.sparkContext.addJar("dbfs:/FileStore/jars/lib1_2.12-0.3.jar")
    // insert additional libraries here...
}
import lib1.mod1

val someBlah = mod1.someMethod("blah")
Notice that we have moved any import statements to after the adding of the referenced library files.
If you do find that you need to extend this to scenario 3, you can simply add a condition based on the ‘SparksessionUtil.is_cluster_direct_exec‘ method. At some point however you’ll probably want to use cluster-installed libraries.
If you add the above to your code entry point, including your referenced libraries as necessary, you can then manage your libraries’ versions independently of the cluster. This avoids disruption to other team members and any incoming low-flying donuts/staplers/deckchairs that may result.
Limitations with Databricks Connect
You’ll only be able to use the secrets and file system (fs) elements of DBUtils if you are using databricks connect. This shouldn’t be an issue as the other elements are generally more for notebook development.
If you are developing with Scala against Spark 3.0+, such as with databricks runtimes 8.x, you won’t have the required DBUtils library available. You can find the DBUtils version for Scala 2.11 on Maven, but 2.12 is not there. It is however available on the driver node of your clusters. You can use the Web Terminal within the Databricks service to connect to the driver node and download from there, for local development using databricks. First you’ll need to copy it from the driver node’s source directory to somewhere more accessible. The command below will do this for those not familiar with bash.
# Create a directory within the FileStore directory, which is available from our workspace
mkdir dbfs/FileStore/dbutils
# copy from the driver node jars directory to our new accessible dbutils directory
cp /databricks/jars/spark--dbutils--dbutils-api-spark_3.1_2.12_deploy.jar dbfs/FileStore/dbutils/
You can then either use the databricks CLI to copy across locally, or simply browse to the file in your web browser. If you do the latter you’ll need to grab your workspace URL from the Azure Portal – you’ll find it top right of the workspace resource.

Your URL will have a format like that below.
https://adb-myorgidxxxxx.nn.azuredatabricks.net/?o=myorgidxxxxx
You can access the file required by adding the file path, where ‘/files/’ refers to the ‘FileStore’ source, so ‘/files/dbutils/spark–dbutils–dbutils-api-spark_3.1_2.12_deploy.jar’ is our file of interest.
https://adb-myorgidxxxxx.nn.azuredatabricks.net/files/dbutils/spark–dbutils–dbutils-api-spark_3.1_2.12_deploy.jar?o=myorgidxxxxx
You can then use this jar file for local development with Scala 2.12. Notice the naming convention used includes the Scala version. Now can I get that ‘Woop Woop’? I can, oh that’s wonderful. I’m welling up here…
You should hopefully have a good few things to help you with your databricks development by this point in our series. We’ve covered setting up your own local Spark and also local development using databricks clusters, thereby catering for the most productive development scenarios. You’ll be cranking out great code in no time via your favourite development tools, with integrated support for testing frameworks, debugging and all those things that make coding a breeze. Ta ta for now.

In this next post in our series focussing on Databricks development, we’ll look at how to create our own Hive metastore locally using SQL Server, and wire it up for the use of our development environment. Along the way we’ll dip into a few challenges with getting this running with your own projects and how to overcome them. This should provide us with our final element of our local Spark environment for Databricks development.
Part of the larger Apache Hive data warehouse platform, the Hive metastore is a repository for details relating to Hive databases and their objects. It is adopted by Spark as the solution for storage of metadata regarding tables, databases and their related properties. An essential element of Spark, it is worth getting to know this better so that it can be safeguarded and leveraged for development appropriately.
The default implementation of the Hive metastore in Apache Spark uses Apache Derby for its database persistence. This is available with no configuration required but is limited to only one Spark session at any time for the purposes of metadata storage. This obviously makes it unsuitable for use in multi-user environments, such as when shared on a development team or used in Production. For these implementations Spark platform providers opt for more robust multi-user ACID-compliant relational database product for hosting the metastore. Databricks opts for Azure SQL Database or MySQL and provides this preconfigured for your workspace as part of the PaaS offering.
Hive supports hosting the metastore on Apache Derby, Microsoft SQL Server, MySQL, Oracle and PostgreSQL.
For our local development purposes, we’ll walk through hosting the metastore on Microsoft SQL Server Developer edition. I won’t be covering the installation of SQL Server as part of this post as we’ve got plenty to be blabbering on about without that. Please refer to the Microsoft Documentation or the multitude of articles via Google for downloading and installing the developer edition (no licence required).
Hive uses a service called HiveServer for remote clients to submit requests to Hive. Using Apache Thrift protocols to handle queries using a variety of programming languages, it is generally known as the Thrift Server. We’ll need to make sure that we can connect to this in order for our metastore to function, even though we may be connecting on the same machine.
Spark includes the required Hive jars in the \jars directory of your Spark install, so you won’t need to install Hive separately. We will however need to take a look at a few of the files provided in the Hive code base to help with configuring Spark with the metastore.
It is worth mentioning at this point that, unlike Spark, there is no Windows version of Hive available. We could look to running via Cygwin or Windows Subsystem for Linux (WSL) but we don’t actually need to be running Hive standalone so no need. We will be creating a metastore database on a local instance of SQL Server and pointing Spark to this as our metadata repository. Spark will use its Hive jars and the configurations we provide and everything will play nicely together.
Within the Hive code base there is a tool to assist with creating and updating of the Hive metastore, known as the ‘SchemaTool‘. This command line utility basically executes the required database scripts for a specified target database platform. The result is a metastore database with all the objects needed by Hive to track the necessary metadata. For our purposes of creating the metastore database we can simply take the SQL Server script and execute it against a database that we have created as our metastore. The SchemaTool application does also provide some functionality around updating of schemas between Hive versions, but we can handle that with some judicious use of the provided update scripts should the need arise at a later date.
We’ll be using the MSSQL scripts for creating the metastore database, which are available at:
https://github.com/apache/hive/tree/master/metastore/scripts/upgrade/mssql
In particular, the file hive-schema-2.3.0.mssql.sql which will create a version 2.3.0 metastore on Microsoft SQL Server.
Okay first things first, we need a database. We also need a user with the required permissions on the database. It would also be nice to have a schema for holding all the created objects. This helps with transparency around what the objects relate to, should we decide to extend the database with other custom objects for other purposes, such as auditing or configuration (which would sit nicely in their own schemas). Right, that said, here’s a basic script that’ll set that up for us.
create database metastore;

create login metastore with
password = 'some-uncrackable-adamantium-password',
default_database = metastore;

use Hive;

create user metastore for login metastore;
go;
create schema meta authorization metastore;
go;
grant connect to metastore;
grant create table to metastore;
grant create view to metastore;
alter user metastore with default_schema = meta;
For simplicity I’ve named my database ‘Hive’. You can use whatever name you prefer, as we are able to specify the database name in the connection configuration.
Next of course we need to run the above hive schema creation script that we acquired from the Hive code base, in order to create the necessary database objects in the Hive metastore.
Ensure that you are logged in as the above metastore user so that the default schema above is applied when the objects are created. Execute the hive schema creation script.
The resultant schema isn’t too crazy.
You can see some relatively obvious tables created for Spark’s metadata needs. The DBS table for example lists all our databases created, and TBLS contains, yep, you guessed it, the tables and a foreign key to their related parent database record in DBS.
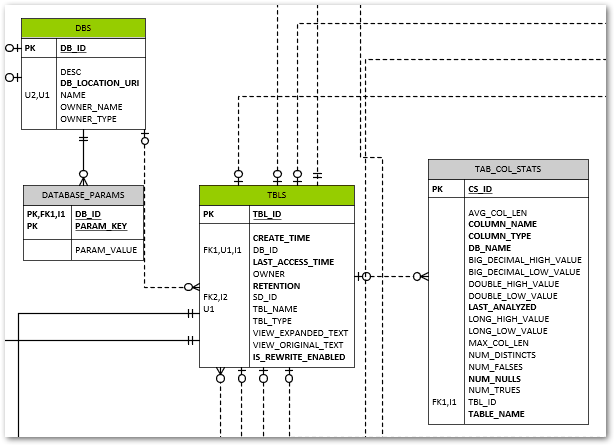
The VERSION table contains a single row that tracks the Hive metastore version (not the Hive version).
Having this visibility into the metadata used by Spark is a big benefit should you be looking to drive your various Spark-related data engineering tasks from this metadata.
One file we don’t have included as standard in the Spark code base is the JDBC driver to allow us to connect to SQL Server. We can download this from the link below.
From the downloaded archive, we need a Java Runtime Engine 8 (jre8) compatible file, and I’ve chosen mssql-jdbc-9.2.1.jre8.jar as a pretty safe bet for our purposes.
Once we have this, we need to simply copy this to the \jars directory within our Spark Home directory and we’ll have the driver available to Spark.
Great, we have our metastore database created and the necessary driver file available to Spark for connecting to the respective SQL Server RDBMS platform. Now all we need to do is tell Spark where to find it and how to connect. There are a number of approaches to providing this, which I’ll briefly outline.
This file allows the setting of various Hive configuration parameters in xml format, including those for the metastore, which are then picked up from a standard location by Spark. This is a good vehicle for keeping local development-specific configurations out of a common code base. We’ll use this for storing the connection information such as username, password, and we’ll bundle in the jdbc driver and jdbc connection URL. A template file for hive-site.xml is provided as part of the hive binary build, which you can download at https://dlcdn.apache.org/hive/. I’ve chosen apache-hive-2.3.9-bin.tar.gz.
You’ll find a hive-site.xml.template file in the \conf subdirectory which contains details of all the configurations that can be included. It may make your head spin looking through them, and we’ll only use a very small subset of these for our configuration.
Here’s what our hive-site.xml file will end up looking like. You’ll need to fill in the specifics for your configuration parameters of course.
<configuration>
    <property>
        <name>hive.exec.scratchdir</name>
        <value>some-path\scratchdir</value>
        <description>Scratch space for Hive jobs</description>
    </property>
    <property>
        <name>hive.metastore.warehouse.dir</name>
        <value>some-path\spark-warehouse</value>
        <description>Spark Warehouse</description>
    </property>
    <property>
      <name>javax.jdo.option.ConnectionURL</name>
      <value>jdbc:sqlserver://some-server:1433;databaseName=metastore</value>
    <description>JDBC connect string for a JDBC metastore</description>
    </property>
    <property>
      <name>javax.jdo.option.ConnectionDriverName</name>
      <value>com.microsoft.sqlserver.jdbc.SQLServerDriver</value>
      <description>Driver class name for a JDBC metastore</description>
    </property>
    <property>
      <name>javax.jdo.option.ConnectionUserName</name>
      <value>metastore</value>
      <description>username to use against metastore database</description>
    </property>
    <property>
      <name>javax.jdo.option.ConnectionPassword</name>
      <value>some-uncrackable-adamantium-password</value>
      <description>password to use against metastore database</description>
    </property>
</configuration>
You’ll need to copy this file to your SPARK_HOME\conf directory for this to be picked up by Hive.
Note the use of the hive.metastore.warehouse.dir setting to define the default location for our hive metastore data storage. If we create a Spark database without specifying an explicit location our data for that database will default to this parent directory.
This allows for setting of various spark configuration values, each of which starts with ‘spark.’. We can set within here any of the values that we’d ordinarily pass as part of the Spark Session configuration. The format is simple name value pairs on a single line, separated by white space. We won’t be making use of this file in our approach however, instead preferring to set the properties via the Spark Session builder approach which we’ll see later. Should we want to use this file, note that any Hive-related configurations would need to be prefixed with ‘spark.sql.’.
The third option worth a mention is the use of the configuration of the SparkSession object within our code. This is nice and transparent for our code base, but does not always behave as we’d expect. There are a number of caveats worth noting with this approach, some of which have been garnered through painful trial and error.
Seems pretty obvious when you think about it really. You can only set properties which are prefixed spark.
As previously mentioned, just to make things clear, if we want to add any Hive settings, we need to prefix these ‘spark.sql.’
All our SparkConf values must be set and applied to the SparkContext object with which we create our SparkSession. The same SparkConf must be used for the Builder of the SparkSession. This is shown in the code further down when we come to how we configure things on the SparkSession.
The hive thrift server URL must be specified when we’re creating our own SparkSession object. This is an important point for when we want to configure our own SparkSession such as for adding the Delta OSS extensions. If you are using a provided SparkSession, such as when running PySpark from the command line, this will have been done for you and you’ll probably be blissfully unaware of the necessity of this config value. Without it however you simply won’t get a hive metastore connection and your SparkSession will not persist any metadata between sessions.
We’ll need to add the delta extensions for the SparkSession and catalog elements in order to get Delta OSS functionality.
Building on the SparkSessionUtil class that we had back in Local Development using Databricks Clusters, adding the required configurations for our hive metastore, our local SparkSession creation looks something like
import os
from pyspark import SparkConf, SparkContext
from pyspark.sql import SparkSession
from delta import *
from pathlib import Path

DATABRICKS_SERVICE_PORT = "8787"


class SparkSessionUtil:
    """
    Helper class for configuring Spark session based on the spark environment being used.
    Determines whether are using local spark, databricks-connect or directly executing on a cluster and sets up config
    settings for local spark as required.
    """

    @staticmethod
    def get_configured_spark_session(cluster_id=None):
        """
        Determines the execution environment and returns a spark session configured for either local or cluster usage
        accordingly
        :param cluster_id: a cluster_id to connect to if using databricks-connect
        :return: a configured spark session. We use the spark.sql.cerespower.session.environment custom property to store
        the environment for which the session is created, being either 'databricks', 'db_connect' or 'local'
        """
        # Note: We must enable Hive support on our original Spark Session for it to work with any we recreate locally
        # from the same context configuration.
        # if SparkSession._instantiatedSession:
        #     return SparkSession._instantiatedSession
        if SparkSession.getActiveSession():
            return SparkSession.getActiveSession()
        spark = SparkSession.builder.config("spark.sql.cerespower.session.environment", "databricks").getOrCreate()
        if SparkSessionUtil.is_cluster_direct_exec(spark):
            # simply return the existing spark session
            return spark
        conf = SparkConf()
        # copy all the configuration values from the current Spark Context
        for (k, v) in spark.sparkContext.getConf().getAll():
            conf.set(k, v)
        if SparkSessionUtil.is_databricks_connect():
            # set the cluster for execution as required
            # Note: we are unable to check whether the cluster_id has changed as this setting is unset at this point
            if cluster_id:
                conf.set("spark.databricks.service.clusterId", cluster_id)
                conf.set("spark.databricks.service.port", DATABRICKS_SERVICE_PORT)
                # stop the spark session context in order to create a new one with the required cluster_id, else we
                # will still use the current cluster_id for execution
            spark.stop()
            con = SparkContext(conf=conf)
            sess = SparkSession(con)
            return sess.builder.config("spark.sql.cerespower.session.environment", "db_connect",
                                       conf=conf).getOrCreate()
        else:
            # Set up for local spark installation
            # Note: metastore connection and configuration details are taken from <SPARK_HOME>\conf\hive-site.xml
            conf.set("spark.sql.extensions", "io.delta.sql.DeltaSparkSessionExtension")
            conf.set("spark.sql.catalog.spark_catalog", "org.apache.spark.sql.delta.catalog.DeltaCatalog")
            conf.set("spark.broadcast.compress", "false")
            conf.set("spark.shuffle.compress", "false")
            conf.set("spark.shuffle.spill.compress", "false")
            conf.set("spark.master", "local[*]")
            conf.set("spark.driver.host", "localhost")
            conf.set("spark.sql.debug.maxToStringFields", 1000)
            conf.set("spark.sql.hive.metastore.version", "2.3.7")
            conf.set("spark.sql.hive.metastore.schema.verification", "false")
            conf.set("spark.sql.hive.metastore.jars", "builtin")
            conf.set("spark.sql.hive.metastore.uris", "thrift://localhost:9083")
            conf.set("spark.sql.catalogImplementation", "hive")
            conf.set("spark.sql.cerespower.session.environment", "local")
            spark.stop()
            con = SparkContext(conf=conf)
            sess = SparkSession(con)
            builder = sess.builder.config(conf=conf)

            return configure_spark_with_delta_pip(builder).getOrCreate()

    @staticmethod
    def is_databricks_connect():
        """
        Determines whether the spark session is using databricks-connect, based on the existence of a 'databricks'
        directory within the SPARK_HOME directory
        :param spark: the spark session
        :return: True if using databricks-connect to connect to a cluster, else False
        """
        return Path(os.environ.get('SPARK_HOME'), 'databricks').exists()

    @staticmethod
    def is_cluster_direct_exec(spark):
        """
        Determines whether executing directly on cluster, based on the existence of the clusterName configuration
        setting
        :param spark: the spark session
        :return: True if executing directly on a cluster, else False
        """
        # Note: using spark.conf.get(...) will cause the cluster to start, whereas spark.sparkContext.getConf().get does
        # not. As we may want to change the clusterid when using databricks-connect we don't want to start the wrong
        # cluster prematurely.
        return spark.sparkContext.getConf().get("spark.databricks.clusterUsageTags.clusterName", None) is not None
Note this has been updated to use the Delta OSS 1.0 library, with the handy configure_spark_with_delta_pip function.
We can test our local hive metastore is working simply by creating some objects to store therein and confirming that these are persisted across SparkSession lifetimes.
import ntpath
import posixpath
from os import path
from SparkSessionUtil import SparkSessionUtil

data_root = 'd:\dev\data'
db_name = 'test_metastore_persist'
table_name = 'test_table'
db_path = f"'{path.join(data_root, db_name)}'".replace(ntpath.sep, posixpath.sep)
spark = SparkSessionUtil.get_configured_spark_session()
spark.sql(f"""create database if not exists {db_name} location {db_path}""")
spark.sql(f"""create table if not exists {db_name}.{table_name}(Id int not null)""")

# reset our spark session
spark = None

spark = SparkSessionUtil.get_configured_spark_session()
# confirm the database and table created above are available in the metastore
spark.sql(f"show tables in {db_name}").show(truncate=False)
After recreating the spark session, we see that we still have our database and table previously created. Success!
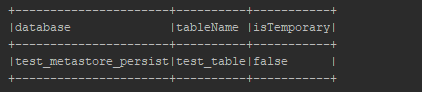
Along time ago in a gala…. no wait, stop, back up, more, more, right, thanks, that’s already been done. Right, where were we? Ah yes, so a quick summary of where we’re at with our local Spark setup and what we’ve covered off to date within this series:
Right so with all that said, in our next post we’ll get round to looking at some approaches to testing our code for successful Databricks deliveries.


