
Local Databricks Development on Windows
This post sets out steps required to get your local development environment setup on Windows for databricks. It includes setup for both Python and Scala development requirements. The intention is to allow you to carry out development at least up to the point of unit testing your code. Local databricks development offers a number of obvious advantages. With Windows being a popular O/S for organisations’ development desktops it makes sense to consider this setup. Considerations for cost reduction, developing offline, and, at least for minimal datasets, faster development workflow as network round-tripping is removed, all help. Right, with that said, let’s take a look at what we need to get started. I’ll split things into core requirements, just Python, just Scala, and Python and Scala, to cover off the main development scenarios. Apologies in advance to R users as not being an R user I won’t be covering this.
Core Requirements
Install WinUtils
This is a component of the Hadoop code base that is used for certain Windows file system operations and is needed for Spark to run on Windows. You can read about how to compile your own version from the Hadoop code base, or acquire a precompiled version, in my post on the subject here. I’ll skip to the point where you have the compiled code, either from downloading from GitHub precompiled, or by compiling from source.
Which version of WinUtils?
Spark can be built against various versions of Hadoop, and adopts a naming convention in its tar or zip archive that includes both the Spark version and Hadoop version, ‘Spark-<spark-version>-<bin/src>-hadoop<hadoop-version>.tgz‘, e.g. Spark-3.1.2-bin-hadoop3.2.tgz. If you are planning on using the PySpark python package for development you will need to use the version of Hadoop that is included.
On non-windows environments you can choose which version of Hadoop to include with your PySpark by setting the PYSPARK_HADOOP_VERSION environment variable prior to calling ‘pip install pyspark=<version>’, however this doesn’t appear to work for Windows, forcing you to use the default version of Hadoop for the package. For PySpark 3.1.2, this is Hadoop 3.2. For those interested, further information on hadoop version-specific installs of PySpark on non-windows systems is available at https://spark.apache.org/docs/latest/api/python/getting_started/install.html.
As we’re on Windows, we’ll go with our PySpark 3.1.2. and Hadoop 3.2, which means we need WinUtils from the Hadoop 3.2 build.
Precompiled Code
Simply copy this to a local folder, e.g. D:\Hadoop\WinUtils, and make a note of the ‘\bin‘ subdirectory which contains the winutils.exe file.
Own Compiled Code
If you’ve built your own winutils.exe, you’ll need to create a \bin directory to house, e.g. D:\Hadoop\WinUtils\bin and copy winutils.exe, libwinutils.lib, hadoop.dll and hadoop.lib files here.
Environment Variables
HADOOP_HOME
You then need to add an environment variable ‘HADOOP_HOME‘ for Spark to understand where to find the required Hadoop files. You can do this using the following powershell:
# Setting HADOOP_HOME System Environment Variable
[System.Environment]::SetEnvironmentVariable('HADOOP_HOME', 'D:\Hadoop\winutils', [System.EnvironmentVariableTarget]::Machine)
Note: This needs to be the name of the parent of the bin directory, with no trailing backslash.
As environment variables are initialised on startup of terminals, IDEs etc, any that are already open will need to be reopened in order to pick up our ‘HADOOP_HOME‘.
Path
We’ll also need to add the path to the bin directory to our Path variable, if we want to invoke ‘winutils’ from the command line without using the full path to the .exe file. The following is based on a path of D:\Hadoop\winutils\bin for our winutils.exe.
# Append winutils.exe folder location to the System Path
[System.Environment]::SetEnvironmentVariable('Path', "${env:Path};D:\Hadoop\winutils\bin;", [System.EnvironmentVariableTarget]::Machine)
Java JDK
Spark requires Java 1.8 to run. It won’t run with later versions, so we need to be specific here. You can download either the Oracle SE JDK here, or the OpenJDK here. Please note the change in the licencing agreement if opting for Oracle SE and using in commercial development.
Run the installer, following the desired options and make a note of your installation path.
Environment Variables
JAVA_HOME
This should have been set by the installer and will point to the root of your JDK installation.
Path (Optional)
This will make the various executables within the JDK accessible without requiring an explicit path, something of use for any future Java development. It is not required for our Spark installation purposes but I’ve included this for completeness here should you want to use these.
# Append winutils.exe folder location to the System Path
[System.Environment]::SetEnvironmentVariable('Path', "${env:Path};D:\Java\jdk1.8.0_191\bin;", [System.EnvironmentVariableTarget]::Machine)
Okay, that’s us done with the core requirements parts. Now onto the development scenario specifics.
Python-Only Development
Install Anaconda
This is my preferred option for getting Python setup for data development. Local databricks development can involve using all manner of python libraries alongside Spark. Anaconda makes managing Python environments straight forward and comes with a wide selection of packages in common use for data projects already included, saving you having to install these. You can run Spark without this if you prefer, you’ll just have to download Python (recommended 3.7 but min. 3.5 for Windows) and configure environments using the Python native tools for this, none of which is particularly difficult. I won’t cover that approach here as this is easily done with the help of a quick Google search.
You can download Anaconda for Windows here.
New Python Environment (Optional)
It may make sense to create a separate environment for your Spark development. You can if you prefer simply use the ‘base’ environment, else you can create your own via either the Anaconda prompt or the Anaconda Navigator. Both are well documented and so again I won’t be detailing here. I’ve created a ‘pyspark’ environment for this purpose. If you do create a new environment make sure that you activate this for any Python steps that follow. This is something often missed if you are not familiar with working with Python environments.
Install PySpark
Using either the Anaconda prompt or Anaconda Navigator install the pyspark package. Due to a compatibility issue with the latest delta.io code and Spark 3.1, if you are intending on using databricks Delta (see below), the latest version you can specify is version 3.0.0 rather than the current 3.1.1 version. This issue exists only with the OSS version of the Delta code base and not with the databricks commercial offering.
Note: The pyspark package includes all required binaries and scripts for running Spark (except the WinUtils files noted above required for Windows). It is not required to download Spark separately for local databricks development if using pyspark.
Scala-Only Development
If you have no Python installation and want to develop using only Scala, then you will need to take a slightly different approach to running Spark.
Note: Before considering Scala only, if you are planning on using Databricks Connect be aware that you will need to have Python installed, so your better option will probably be as outlined in the ‘Python and Scala Development’ section below.
Install Spark
Without pyspark installed, for local databricks development you’ll need to download the required Spark binaries, which can be done here. You can choose either the download with or that without Hadoop for our purposes, either is fine. The main difference between these is the inclusion of about 70MB of additional jars in the \jars directory for the Hadoop download. Extract these to a directory of your choosing such as D:\Spark. We’ll need to add some environment variables as below, so for now make a note of the directory chosen and we’re done for now.
Scala Development Environment
We won’t cover how to setup the Scala environment itself. You can find details here for the Intellij IDE, or here for VSCode, which uses the ‘Metals’ language server. You can also simply install the Scala binaries, the latest version of which are available here, and then use the command line. You can find instructions here if required.
Python and Scala Development
If you are developing in both Python and Scala, not uncommon if you have both ‘Data Engineer’ and ‘Data Scientist’ aspects to your work, you will not need all the steps outlined above for ‘Scala-Only Development’. Follow the Python-Only steps, which will install Spark via the pyspark Python package, and then simply setup your development environment as mentioned in the ‘Scala-Only Development – Scala Development Environment’ section above.
Spark Environment Variables
Depending on whether you have used the pyspark Python package to provide the Spark binaries for your local databricks development, or whether you have downloaded Spark separately, you will need to amend the following based on the destination of your files.
SPARK_HOME
This should be set to the root of the Spark files. For pyspark, you will find the package installed to either <PathToAnaconda>\Lib\site-packages\pyspark, e.g. D:\Anaconda3\Lib\site-packages\pyspark, if you are using the ‘base’ environment, or if you have created your own environment you’ll find the default path at <PathToAnaconda>\Envs\<EnvName>\Lib\site-packages\pyspark. Amend the following powershell accordingly.
# Setting HADOOP_HOME System Environment Variable
[System.Environment]::SetEnvironmentVariable('SPARK_HOME', 'D:\Anaconda3\envs\pyspark\Lib\site-packages\pyspark', [System.EnvironmentVariableTarget]::Machine)
Path
The following will need to be added to your path in order to run the various Spark commands from the command line:
%SPARK_HOME%\bin
%SPARK_HOME%\sbin
Here’s some powershell I made earlier…
# Append required pyspark paths to the System Path
[System.Environment]::SetEnvironmentVariable('Path', "${env:Path};${env:SPARK_HOME}\bin;${env:SPARK_HOME}\sbin;", [System.EnvironmentVariableTarget]::Machine)
Add Databricks Delta Libraries
The databricks Delta libraries for Spark add some fantastic functionality to Spark SQL and are very much revolutionising data lakes and data warehousing with their ‘LakeHouse‘ architecture. You can read all about Delta here. Suffice to say that these libraries will probably feature in your local databricks development.
Note that there are actually two different development streams for Delta. One is that used on the commercial databricks service, The other is that made Open Source at the previous link, which we’ll be using. I’ll refer to this as Delta OSS to avoid confusion.
Known Issue with Delta OSS 0.8.0 and Spark 3.1
Unfortunately there is an issue with using Delta OSS 0.8.0 with Spark 3.1. The setting of the Spark configuration ‘spark.sql.catalog.spark_catalog‘ to ‘org.apache.spark.sql.delta.catalog.DeltaCatalog‘ will result in an error that prevents using Delta. Some users have suggested simply omitting setting this configuration value, however this then causes further headaches when working with delta tables. You’ll get errors relating to the table metadata, such as ‘Cannot write nullable values to non-null column <colName>‘, and errors trying to cast values to dates and all sorts of other woes. These errors only really hint at what might be up, which appears to be the lack of the DeltaCatalog required for correct table metadata storage. The only real solution is to use Spark 3.0 with Delta OSS, which for local development should not be an issue. I’m told this issue should be resolved in Spark 3.2. As previously mentioned, there is no issue with the commercial offering available on the databricks platform, only with the Delta OSS code.
You can read the quickstart guide at delta.io here to see how we can use the Delta libraries for the various ways of working locally you may have adopted. I’ll include the Python and Scala ones here for completeness.
Delta-Spark 1.0.0 PyPI Package
With the version 1.0.0 release of Delta OSS we now have a PyPI package available. This is great news. We can now use pip to install the package as below:
pip install delta-spark=1.0.0
This will install the Python wrappers for Delta OSS but will not include the related Scala jar files that are the core of the code base. The jars will be fetched at runtime as described below:
Acquiring the Scala Library and Enabling the Delta OSS Functionality
Delta OSS 0.8.0
Python
Add the following code to your Spark session configuration
spark = pyspark.sql.SparkSession.builder.appName("MyApp") \
    .config("spark.jars.packages", "io.delta:delta-core_2.12:0.8.0") \
    .config("spark.sql.extensions", "io.delta.sql.DeltaSparkSessionExtension") \
    .config("spark.sql.catalog.spark_catalog", "org.apache.spark.sql.delta.catalog.DeltaCatalog") \
    .getOrCreate()

from delta.tables import *
The ‘spark.jars.packages‘ link will cause the jar files to be downloaded from Maven and stored in your local Ivy package store, the default location being .ivy2\jars within your user home directory.
Including the Libraries for Development
If you open up the io.delta_delta-core_2.12-0.8.0.jar archive file (any zip program should do) you will see that there is also a Python file included, delta\tables.py.

This contains the python code for interfacing with the underlying Scala implementation. With the jar added to your Spark session you are then able to import the Python module ‘delta\tables.py‘ and add Delta table functionality to your efforts.
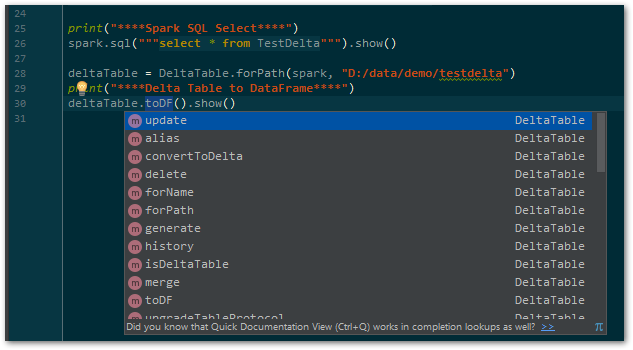
Code Completion/Linting in PyCharm
Pycharm won’t recognise the tables.py file that is contained in the jar, as it is only visible to Spark at runtime. The delta code base is not available as a Python package and so cannot be ‘installed’ to Python and easily recognised by PyCharm. In order to have fully functional code completion you will need to download the source code and add the required path to the project structure as a ‘Content Root’ so that it is visible. You can download the required release for your local databricks development from GitHub here. Unzip it to a suitable location locally and within PyCharm, in File | Settings | Project: <projectName> | Project Structure, add the python\delta folder as a ‘Content Root’ as shown below.

By using the above ‘from delta.tables import *‘ you will then have Delta code completion within your PyCharm environment.
Delta OSS 1.0.0
With the release of the PyPI package for delta-spark, we have none of the above hoops to jump through to get our Delta OSS code working in Python. As it is available in our virtual environment, we can simply import the required modules and code completion/Linting will be available to our IDE. Happy days. We do however still need to acquire the Scala library and enable the required functionality. The Spark Session configuration is very similar to that for Delta OSS 0.8.0 above, with the added bonus of a handy utility function ‘configure_spark_with_delta_pip’ to ensure that we grab the correct Scala jar file without hard coding the version. Pass in your configured Spark Session Builder object, and this will add the ‘spark.jars.packages‘ configuration value for the required jar that we had to add ourselves in 0.8.0.
# delta-spark 1.0.0 brings a handy configuration function for acquiring the Scala jars...
spark = configure_spark_with_delta_pip(
    pyspark.sql.SparkSession.builder.appName("MyApp")
    .config("spark.sql.extensions", "io.delta.sql.DeltaSparkSessionExtension")
    .config("spark.sql.catalog.spark_catalog", "org.apache.spark.sql.delta.catalog.DeltaCatalog")
    ).getOrCreate()

from delta.tables import *
Add the jar file to PySpark
If you are using the PySpark package to provide your local Spark code base, as opposed to downloading the Spark code and installing to a local directory, you’ll need to add the required delta-core jar file to your PySpark\jars folder. Simply copy this from the .ivy location above and you’re done.
Scala
Maven
Add the following to your Maven pom file:
<dependency>
  <groupId>io.delta</groupId>
  <artifactId>delta-core_2.12</artifactId>
  <version>0.8.0</version>
</dependency>
Note: Change your version accordingly to whatever version of Delta OSS you are using.
SBT
If using SBT, you can simply add the following to your build.sbt file:
libraryDependencies += "io.delta" %% "delta-core" % "0.8.0"
Note: Change your version accordingly to whatever version of Delta OSS you are using.
You now have Delta functionality within your locally developed Spark code. Smokin’…
And We’re Good To Go…
We now have our local databricks development environment setup on Windows to allow coding against Spark and Delta. This won’t necessarily serve all your needs, with aspects like integration testing probably falling out of scope. It should however remove the need to always have clusters up, reduce disruption that would be caused on a shared development environment, as well as increasing productivity during development. Personally I find it well worth setting up and hope you will find considerable benefits from this way of working.
In the next post we’ll be looking at hooking up databricks connect with your local dev tools for when you need to run against a databricks cluster. Thanks for reading and see you soon.
Nigel Meakins administrator
Having worked for many years in the world of data and analytics, I enjoy following new innovations and understanding how best to apply them within business. I have a broad technical skill set and an acute awareness of how to make Agile work on data projects. Working at all levels and in a variety of roles on projects, I help our clients understand how the latest technology can be applied to realise greater value from their data.


About the author