Automate Your Power BI Dataset Refresh with Python
Introduction
Most people using Power BI normally do so with Microsoft technology at the core of their business and IT operations. Power BI is rapidly adding connectors for non-Microsoft technologies and new capabilities on a monthly basis. The combination of new sources, excellent visualisation and modelling, and a low price point is leading to it being used with technologies other than the Microsoft data platform.
This blog is the result of one such project. I am currently using Power BI as the main reporting tool on a Google Cloud Platform (GCP) data project. There are lots of interesting topics to discuss given the technologies being used. However, this post is going to focus on the programmatic refreshing of your Power BI datasets using Python. “Why Python?” I hear you say. Well the workflow tool used on GCP is none other than Apache Airflow, implemented as Composer. Apache Airflow is written in Python and you create all of your workflows using Python.
When I looked at the Power BI REST API documentation all of the examples were in C#. After a lot of reading and experimenting (aka hitting my head against my desk), I had the process running the way I wanted. This post is my attempt at creating the document I wish existed when I started.
The main steps
It is important to understand the main steps involved in this process before we get into the detail. Having this high-level process clearly defined was one of the things missing from the information online.
- The first step is to create an App registration for your application. This will provide you with a client id for your app which is needed for authentication later on.
- Next you will grant your App the permissions it requested in Azure AD.
- Using the information from the previous steps you acquire an authentication token from Azure AD in your python code.
- Finally, you use the authentication token to call the Power BI REST API.
Registering your App
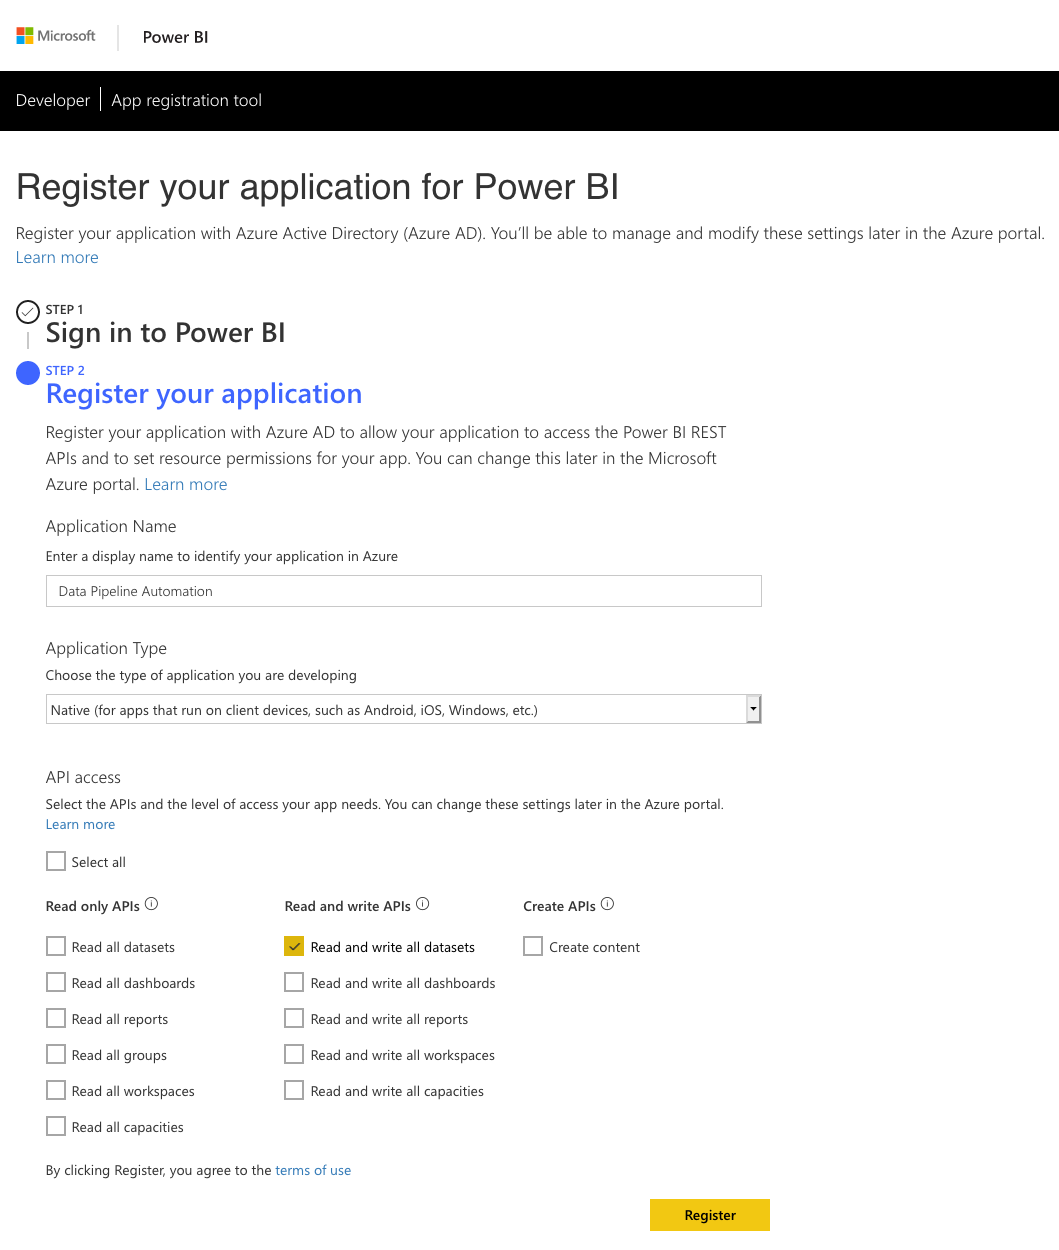
The first and most important part of this entire process is to create a Power BI app registration. There are multiple ways of doing this and this video from Guy in a Cube will give you all of the information you need. No matter how you choose to do your app registration there are three main things you need to know.
1. The Power BI REST API only supports delegated permissions. That means that you need to run any calls to the REST API in the context of a user. For unattended applications, such as our data pipeline step, you need to register your app as a Native app. You only receive the client id when you register it as native app. Server-side Web apps receive both a client id and client secret but this is the wrong type of app for our use case. When you authenticate from your code you will need the client id together with the username and the password of the account that has delegated these permissions to the app.
2. You need to ensure you select the correct permissions when registering your app. For our purposes we need access to Read and write all datasets. As always take the approach of providing the minimum permissions needed. You can always add more permissions later in the Azure Portal.
3. This brings us to the most overlooked yet important point which is granting permissions to the App in the Azure Portal. You need to log into the Azure Portal with the account that will be delegating the permissions to the app. This will be the account of which you will pass the username, password with the client id to authenticate against Azure AD. If you do not perform this step you will end up with authentication errors. (You might get an authentication token when you authorise but you won’t get the correct scope in the access token)

Python and the Power BI REST API
Interacting with the Power BI REST API requires a two-step process.
1. Acquiring an access token from Azure AD by supplying your client id, username and password
2. Calling the desired REST API using the access token received in step 1.
There is a choice in how you can perform step 1. You can choose to either use the ADAL Python library or pure REST calls to obtain the access token.
Before we continue a word of caution. In the examples provided below we have the client id, username and password entered directly in the code. This is for demonstration purposes only. I cannot stress this enough. For production solutions you would want to use the credential management best practice of your platform.
ADAL Library
The adal library for Python is the official Microsoft Azure Active Directory authentication library. It provides you with everything you need to authenticate against Azure AD using Python. Below is an example of the code you will use to authenticate and get your access token. Keep in mind that we have to pass the username and password along with the Client ID. No other way of authenticating will give us a token with the scopes we need to call the Power BI REST API successfully.
import adal

authority_url = 'https://login.windows.net/common'
resource_url = 'https://analysis.windows.net/powerbi/api'

client_id = <INSERT CLIENT ID>
username = <INSERT USERNAME>
password = <INSERT PASSWORD>

context = adal.AuthenticationContext(authority=authority_url,
                                     validate_authority=True,
                                     api_version=None)

token = context.acquire_token_with_username_password(resource=resource_url,
                                                     client_id=client_id,
                                                     username=username,
                                                     password=password)

access_token = token.get('accessToken')
As you can see the adal library makes it extremely easy to authenticate against Azure AD and get the token you need.
REST
An alternative to the ADAL library is normal REST API calls to obtain the token. Below is an example of the code you will use if you were using the requests library to make your REST calls.
import requests

url = 'https://login.microsoftonline.com/common/oauth2/token'
data = {
        'grant_type': 'password',
        'scope': 'https://api.powerbi.com',
        'resource': 'https://analysis.windows.net/powerbi/api',
        'client_id': <INSERT CLIENT ID>,
        'username': <INSERT USERNAME>,
        'password': <INSERT PASSWORD>
       }

r = requests.post(url, data=data)
access_token = r.json().get('access_token')
Refreshing the Power BI Dataset
So now that we have gotten our access token, we can move onto the next step which is refreshing our dataset in Power BI. In order to do this, you will need one or two keys depending on where your dataset is located.
If your dataset is in the workspace of the account under which your app will be running, the “My Workspace” of that account, then you only need the dataset key of your dataset. If, however your dataset is located in an app workspace you will need to get both the group id and the dataset key.
You get these values from the URL in your browser when you navigate to the settings of the dataset. Here are examples for each one of the scenarios.
- Dataset in “My Workspace”: https://app.powerbi.com/groups/me/settings/datasets/XXXXXXXX-XXXX-XXXX-XXXX-XXXXXXXXXXXX
- Dataset in a App Workspace: https://app.powerbi.com/groups/XXXXXXXX-XXXX-XXXX-XXXX-XXXXXXXXXXXX/settings/datasets/XXXXXXXX-XXXX-XXXX-XXXX-XXXXXXXXXXXX

Once you have these keys you are ready to construct your API call to refresh your dataset. The Power BI REST API documentation shows the two different API calls.
- Dataset in “My Workspace” refresh URL: POST https://api.powerbi.com/v1.0/myorg/datasets/{datasetKey}/refreshes
- Dataset in App Workspace refresh URL: POST https://api.powerbi.com/v1.0/myorg/groups/{groupId}/datasets/{datasetKey}/refreshes
Below is an example of the code you would use to refresh a dataset in an App Workspace.
import adal
import requests

authority_url = 'https://login.windows.net/common'
resource_url = 'https://analysis.windows.net/powerbi/api'

client_id = <INSERT CLIENT ID>
username = <INSERT USERNAME>
password = <INSERT PASSWORD>

context = adal.AuthenticationContext(authority=authority_url,
                                     validate_authority=True,
                                     api_version=None)

token = context.acquire_token_with_username_password(resource=resource_url,
                                                     client_id=client_id,
                                                     username=username,
                                                     password=password)

access_token = token.get('accessToken')

refresh_url = 'https://api.powerbi.com/v1.0/myorg/groups/<INSERT GROUP ID>/datasets/<INSERT DATASET KEY>/refreshes'

header = {'Authorization': f'Bearer {access_token}'}

r = requests.post(url=refresh_url, headers=header)

r.raise_for_status()
Conclusion
As you can see it is extremely easy to refresh your datasets in Power BI using Python and the Power BI REST API. The most common mistakes people make which account for the majority of forum posts online are:
- Register their app as the wrong type, Server-side Web app, instead of the correct type which is Native app.
- Not granting the App permissions in the Azure portal using the account in which context it will be running.
- Trying to acquire the Azure AD token using client credentials, client id and client secret, instead of acquiring it with a username and password.
By getting the steps right you will have no problem in automating your Power BI tasks with Python or any other programming language you choose to use.
Christo Olivier editor
I am a Data and Analytics specialist with extensive consulting experience. I help my clients navigate the challenges of building data solutions that meet business requirements while utilising the best technologies on the market. My extensive experience in leading projects enables me to add value to both the technical delivery as well as strategic decision making of my clients. I have delivered successful solutions in a varied set of industries such as Central Banking, Education, Finance, Healthcare, Mining, Marketing and Retail.


About the author