Modularisation of Terraform and ARM Templates
Modularised Deployment Definition
When it comes to code, everyone loves reuse. DRY is a great principle to follow for any elements of your work and IaC is no exception. Having a modularised deployment definition for resources that is centrally managed, parameterised to allow amending for different deployment scenarios/environments provides massive benefits. So let’s take a quick look at how we achieve modularisation of ARM Templates and Terraform.
ARM Templates
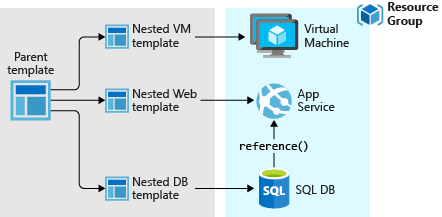
Linked/Nested Templates
ARM allows the calling of templates within templates, using links to other templates within a parent template. This means we can use a modularised deployment definition by separating out across multiple files for ease of maintenance and reuse. There is one rather annoying requirement for this however, and this is that the linked file needs to be accessible from Azure’s deployment executor at the time of deployment. This means storing the templates in a location accessible from within Azure, such as a blob storage account. If we are to use linked templates, we then need to manage the deployment of the files to this location as a prerequisite to the deployment execution. We also can’t ‘peak’ into these files to validate any content or leverage any intellisense from within tools.
Close Coupled Parameter Files
The close coupling of ARM Template parameters with parameter files that we mentioned in the post Deployments with Terraform and ARM Templates does provide some challenges when it comes to centralising definitions across a complete deployment. As previously mentioned, we can include only those parameters within the file that are expected by the respective ARM template. This prevents us from using a single file for all parameters should we desire to do so.
Template Outputs
ARM does allow us to define outputs from linked/nested templates that can be passed back to parent templates. This is useful for items such as Resource IDs and other deployment time values.
Terraform
Terraform Modules
Terraform .tf files can be directly referenced from other modules. You can defined one or more .tf files within a directory, with an associated variable definition file if desired. A simple example of referencing one module from another is shown below.
module "network" {
  source = "./modules/vpn-network"

  address_space = "10.0.0.0/8"
}
Here we are setting an argument for the referenced resource (an ‘azurerm_virtual_network’) address_space as required from within the referencing module. We can also pass in the values for any predefined variables using the same syntax as we have done above for the resource argument, using the variable name rather than the name of a resource argument.
The module references can done using relative local paths, git/GitHub repositories, centralised Terraform registries (public or private), HTTP urls and Azure storage/Amazon S3/GCS Buckets. This offers pretty much any solution to centralised storage that administrators might want to leverage. It also provides a more flexible modularised approach to deployment definition than that offered by ARM templates. Any required modules are acquired as required by the Terraform executor machine within the initialisation stage using the ‘Terraform Init’ action.
The management of these modules is no more complex than managing any code artifacts within your organisation. No concerns over missing redeployment of linked files, and a great selection of options for centralised management. For me this is a big benefit for deployments that involve anything beyond the most basic of resources.
Deployment-Wide Variable Files
Terraform allows variable files to contain all variables required by the deployment with no issues for redundant entries. Variables can be passed in to other Terraform modules as required allowing you to practice concepts such as ‘dependency inversion’, whereby the called module accepts input from the calling module and has no care for what the calling module passes.
Module Outputs
Each Terraform module can also supply outputs, thereby allowing passing back of resultant items such as Resource IDs and the like (as with ARM templates), for use in the calling module.
Conclusion
The modularisation of Terraform and ARM Templates use different approaches that provide varying levels of reuse and centralised management. The linked/nested templates provided by ARM Templates lack the flexibility of referencing and storing that are provided by Terraform. The additional steps required to ensure that the linked files are in place when needed does present a source of potential deployment failure. Terraform’s ability to retrieve modules from pretty much any repository type offers considerable advantages. When coupled with the less restrictive use of variables compared to ARM parameters, Terraform comes out clearly on top in this area.
You can find a great guide on IaC best practices using Terraform and Azure from Julien Corioland of Microsoft at https://github.com/jcorioland/terraform-azure-reference.
Deployments with Terraform and ARM Templates
Introduction
For those organisations hosting their IT resources on Azure, the most popular solutions for cloud resource deployments are Azure Resource Manager(ARM) Templates and Terraform.
Azure’s go to market offering for automation of cloud resource management is provided through ARM Templates. These are a mature offering with the capability to generate templates for previously deployed resources and a library of ready-rolled templates from Azure community contributors. For adopting an Infrastructure as Code (IaC) paradigm for DevOps this is the solution considered first by most Azure-hosted organisations.
The first question many ask when considering an alternative to Microsoft’s ARM template approach to deployment is quite simply “Why bother”? We already have a pretty good approach to managing our infrastructure deployments within Azure, which can be parameterised, version controlled and automated for the vast majority of situations that we will need.
In this first post on the subject of using Terraform on Microsoft Azure, we will take a look at some of the differences between how deployments are defined within Terraform and ARM templates.
Deployment Definition
When defining our deployments, the actual scope of what is included using Terraform or ARM templates is determined using two quite different approaches.
ARM Templates
Azure uses ARM templates to define a unit of deployment. Each template is a self contained deployment, and is executed using either PowerShell or Azure CLI as below:
$templateFile = "{provide-the-path-to-the-template-file}"
$parameterFile="{path-to-azuredeploy.parameters.dev.json}"
New-AzResourceGroup `
  -Name myResourceGroupDev `
  -Location "East US"
New-AzResourceGroupDeployment `
  -Name devenvironment `
  -ResourceGroupName myResourceGroupDev `
  -TemplateFile $templateFile `
  -TemplateParameterFile $parameterFile
templateFile="{provide-the-path-to-the-template-file}"
az group create \
  --name myResourceGroupDev \
  --location "East US"
az group deployment create \
  --name devenvironment \
  --resource-group myResourceGroupDev \
  --template-file $templateFile \
  --parameters azuredeploy.parameters.dev.json
You’ll notice that we have specified a Resource Group for the target of the deployment. We have also specified a parameter file for the deployment, which we’ll touch upon later. All very straight forward really, though this does present some challenges as mentioned below.
Target Resource Group
Each deployment targets a pre-existing Resource Group, so we will need to execute a PowerShell/Azure CLI script to create this prior to executing the ARM template if we are using a new Resource Group. Not exactly a deal breaker, this does require ‘breaking out’ of ARM in order to satisfy this prerequisite.
Deployment Specification
ARM templates use JSON to define the deployment resources and parameters. These can be written using any JSON-firendly editor of course. VSCode has a nice extension from Microsoft that aids with syntax linting, IntelliSense, snippets etc. – just search in the VSCode marketplace for “ARM” from Microsoft. Here’s a quick example of a basic ARM Template showing how we can parameterise our deployment.
{
    "$schema": "https://schema.management.azure.com/schemas/2015-01-01/deploymentTemplate.json#",
    "contentVersion": "1.0.0.0",
    "parameters": {
        "storageName": {
            "type": "string",
            "minLength": 3,
            "maxLength": 24
        }
    },
    "resources": [
        {
            "type": "Microsoft.Storage/storageAccounts",
            "apiVersion": "2019-04-01",
            "name": "[parameters('storageName')]",
            "location": "eastus",
            "sku": {
                "name": "Standard_LRS"
            },
            "kind": "StorageV2",
            "properties": {
                "supportsHttpsTrafficOnly": true
            }
        }
    ]
}
And here is the accompanying parameter file.
{
    "$schema": "https://schema.management.azure.com/schemas/2015-01-01/deploymentParameters.json#",
    "contentVersion": "1.0.0.0",
    "parameters": {
        "storageName": {
            "value": "myuniquesaname"
        }
    }
}
Parameter File Reuse Complexities
Each parameter file is best used with respect to a single ARM template. This is because if the parameter file contains parameters that are not defined within the template, this results in an error. This close coupling of parameter file and parameter definition within the ARM template makes reuse of parameter files across templates very difficult. There are basically two approaches to handling this, neither of which are pretty.
- Repeat the common parameters in each parameter file and use multiple parameter files. Keeping these in sync presents something of a risk to deployments.
- Repeat the parameter definition for unneeded parameters in each ARM template, allowing a single parameter file to be used across templates. This could soon result in templates with more parameters that are redundant than are actually being used.
Auto-Generation of ARM Templates from Azure
The ability to generate ARM templates from existing resources within Azure from the portal is a considerable benefit when bringing items into the IaC code base. This can save a lot of time with writing templates.
Terraform Modules
Terraform defines deployment resources within one or more files, with the ‘.tf’ extension. The language used is ‘HashiCorp Configuration Language’ or ‘HCL’. This is similar in appearance to JSON, with maybe some YAML-like traits sprinkled in I guess. I personally find it slightly easier to work with than JSON. Here’s a basic module.
# Configure the Azure Provider
provider "azurerm" {
  version = "=1.38.0"
}

variable "address_space" {
  type = string
}

# Create a resource group
resource "azurerm_resource_group" "example" {
  name     = "production"
  location = "West US"
}

# Create a virtual network within the resource group
resource "azurerm_virtual_network" "example" {
  name                = "production-network"
  resource_group_name = "${azurerm_resource_group.example.name}"
  location            = "${azurerm_resource_group.example.location}"
  address_space       = [${var.address_space}]
}
Root Module
When executing a Terraform action, such as Deploy, Plan or Validate, it recognises all the .tf files within the current folder as forming what is termed the ‘root module’. These files can themselves reference other modules as defined in other .tf files.
Terraform can create resource groups as part of the deployment, so there is no need create these beforehand. Although this may seem to be a small point, it does allow for a more complete specification and unified approach to encapsulating the whole deployment.
Variable Files
Terraform uses variable for the parameterisation of deployments. These can be declared within any .tf file, but by convention are generally defined in a single file called ‘variables.tf’ for ease of maintenance. This file is usually located in the ‘root module’ directory. The values for the variables can either be set as defaults within the variable declaration file or passed using a file with the extension ‘.tfvars’. For the root module Terraform will automatically use any file called ‘terraform.tfvars’ or ‘auto.tfvars’ if available without the need to specify this. Variables can be used across multiple deployments, with no issues with coupling of variable definitions in two places that we have with ARM templates and their respective parameter files. Variable files and individual variables can also be overridden at the command line when a Terraform action such as Plan, Deploy or Validate is executed, allowing a further level of control.
Auto-Generation from Azure
Terraform does not provide any way of generating module files from pre-existing resources within Azure. There are some feature requests to extend the ‘Import’ functionality, which would allow for specific resources to be imported into module .tf configuration files, which would make a difference to productivity for migrating existing deployments into the IaC code base.
In Summary
Although having essentially the same goal, deployments with Terraform and ARM templates go about things in slightly different ways. These differences may not appear to be of much consequence, but as you’ll see later on in this series, these differences in how the code is structured and resources are managed results in some strengths and weaknesses between the two. We’ve only touched on some of the deployment definition basics here. We’ll go on in the next posts to discuss modularisation of our IaC code and resource dependency management, before diving into how we integrate our Terraform efforts with Azure DevOps for an approach to deployments of infrastructure that is as controlled and well managed as is that of our application code. I hope this has served as a good overview and introduction for those working on Azure, and that the rest of the series will provide some valuable insight into using Terraform for your DevOps needs.
Dynamically Flatten a Parent-Child Hierarchy using Power Query M
Introduction
For those of you familiar with recursive common table expressions in SQL, iterating through a parent-child hierarchy of data is a fairly straight forward process. There are several examples available which demonstrate how one could approach this problem in Power Query M. In this post, we’ll use recursion and dynamic field retrieval to loop through and dynamically flatten a parent-child hierarchy using Power Query M.
Show and Tell
Before we begin, let’s take a quick look at an example of the function being invoked in Power BI. This should hopefully give you some idea of where we’re heading with this.

Dynamically Flatten a Parent-Child Hierarchy using Power Query M
Sample Data
Let’s look at some sample data to get a feel for the type of data the function requires as input and the resultant dataset the function will output.
Input
| ParentNodeID | ParentNodeName | ChildNodeID | ChildNodeName |
|---|---|---|---|
| 100 | Stringer | 2 | Shamrock |
| 200 | Avon | 201 | Levy |
| 200 | Avon | 202 | Brianna |
| 200 | Avon | 203 | Wee-Bey |
| 2 | Shamrock | 3 | Slim Charles |
| 3 | Slim Charles | 51 | Bodie |
| 3 | Slim Charles | 52 | Poot |
| 3 | Slim Charles | 53 | Bernard |
| 51 | Bodie | 61 | Sterling |
| 51 | Bodie | 62 | Pudding |
| 52 | Poot | 61 | Sterling |
| 52 | Poot | 62 | Pudding |
Output
| ParentNodeID | ChildNodeID1 | ChildNodeID2 | ChildNodeID3 | ChildNodeID4 | ParentNodeName | ChildNodeName1 | ChildNodeName2 | ChildNodeName3 | ChildNodeName4 | HierarchyLevel | HierarchyPath | IsLeafLevel | HierarchyNodeID |
|---|---|---|---|---|---|---|---|---|---|---|---|---|---|
| 100 | Stringer | 1 | 100 | false | 100 | ||||||||
| 100 | 2 | Stringer | Shamrock | 2 | 100|2 | false | 2 | ||||||
| 100 | 2 | 3 | Stringer | Shamrock | Slim Charles | 3 | 100|2|3 | false | 3 | ||||
| 100 | 2 | 3 | 51 | Stringer | Shamrock | Slim Charles | Bodie | 4 | 100|2|3|51 | false | 51 | ||
| 100 | 2 | 3 | 51 | 61 | Stringer | Shamrock | Slim Charles | Bodie | Sterling | 5 | 100|2|3|51|61 | true | 61 |
| 100 | 2 | 3 | 51 | 62 | Stringer | Shamrock | Slim Charles | Bodie | Pudding | 5 | 100|2|3|51|62 | true | 62 |
| 100 | 2 | 3 | 52 | Stringer | Shamrock | Slim Charles | Poot | 4 | 100|2|3|52 | false | 52 | ||
| 100 | 2 | 3 | 52 | 61 | Stringer | Shamrock | Slim Charles | Poot | Sterling | 5 | 100|2|3|52|61 | true | 61 |
| 100 | 2 | 3 | 52 | 62 | Stringer | Shamrock | Slim Charles | Poot | Pudding | 5 | 100|2|3|52|62 | true | 62 |
| 100 | 2 | 3 | 53 | Stringer | Shamrock | Slim Charles | Bernard | 4 | 100|2|3|53 | true | 53 | ||
| 200 | Avon | 1 | 200 | false | 200 | ||||||||
| 200 | 202 | Avon | Brianna | 2 | 200|202 | true | 202 | ||||||
| 200 | 201 | Avon | Levy | 2 | 200|201 | true | 201 | ||||||
| 200 | 203 | Avon | Wee-Bey | 2 | 200|203 | true | 203 |
Power Query M Function
The fFlattenHiearchy function consists of an outer function and a recursive inner function.
The outer function will:
- Identify the top level parents
- Trigger the flattening
- Bolt on a few metadata columns
The inner function will:
- Self join onto the input hierarchy table to identify the next level of children within the hierarchy
- Filter out rows where the parent = child, to avoid infinite recursion
Flatten the hierarchy
The below code is used to build the basic hierarchy structure:
(
  hierarchyTable as table
  ,parentKeyColumnIdentifier as text
  ,parentNameColumnIdentifier as text
  ,childKeyColumnIdentifier as text
  ,childNameColumnIdentifier as text
) as table =>
  let
    #"Get Root Parents" = Table.Distinct(
      Table.SelectColumns(
        Table.NestedJoin(hierarchyTable
          ,parentKeyColumnIdentifier
          ,hierarchyTable
          ,childKeyColumnIdentifier
          ,"ROOT.PARENTS"
          ,JoinKind.LeftAnti
        )
        ,{
          parentKeyColumnIdentifier
          ,parentNameColumnIdentifier
        }
      )
    ),
    #"Generate Hierarchy" = fGetNextHierarchyLevel(
      #"Get Root Parents"
      ,parentKeyColumnIdentifier
      ,1
    ),
    fGetNextHierarchyLevel = (
      parentsTable as table
      ,nextParentKeyColumnIdentifier as text
      ,hierarchyLevel as number
    ) =>
      let
        vNextParentKey = childKeyColumnIdentifier & Text.From(hierarchyLevel),
        vNextParentName = childNameColumnIdentifier & Text.From(hierarchyLevel),
        #"Left Join - hierarchyTable (Get Children)" = Table.NestedJoin(parentsTable
          ,nextParentKeyColumnIdentifier
          ,hierarchyTable
          ,parentKeyColumnIdentifier
          ,"NODE.CHILDREN"
          ,JoinKind.LeftOuter
        ),
        #"Expand Column - NODE.CHILDREN" = Table.ExpandTableColumn(#"Left Join - hierarchyTable (Get Children)"
          ,"NODE.CHILDREN"
          ,{
              childKeyColumnIdentifier
              ,childNameColumnIdentifier
          },{
              vNextParentKey
              ,vNextParentName
          }
        ),
        #"Filter Rows - Parents with Children" = Table.SelectRows(#"Expand Column - NODE.CHILDREN"
          ,each Record.Field(_,vNextParentKey) <> null
              and Record.Field(_,vNextParentKey) <> Record.Field(_,nextParentKeyColumnIdentifier)
        ),
        #"Generate Next Hierarchy Level" = if Table.IsEmpty(#"Filter Rows - Parents with Children")
          then parentsTable
          else Table.Combine(
            {
              parentsTable
              ,@fGetNextHierarchyLevel(
                #"Filter Rows - Parents with Children"
                ,vNextParentKey
                ,hierarchyLevel + 1
              )
            }
        )
      in
        #"Generate Next Hierarchy Level"
  in
     #"Generate Hierarchy"
Add additional metadata
Additional metadata columns can be added to the hierarchy by using the code below. My original approach was to update these columns in each iteration of the hierarchy and although the code was slightly more digestible in comparison to the below, I did find it came at the expense of performance.
#"Add Column - HierarchyPath" = Table.AddColumn(#"Generate Hierarchy",
      "HierarchyPath"
      ,each Text.Combine(
        List.Transform(
          Record.FieldValues(
            Record.SelectFields(_,
              List.Select(Table.ColumnNames(#"Generate Hierarchy")
                ,each Text.StartsWith(_,childKeyColumnIdentifier)
                  or Text.StartsWith(_,parentKeyColumnIdentifier)
              )
            )
          )
          ,each Text.From(_)
        )
        ,"|"
      )
      ,type text
    ),
    #"Add Column - HierarchyNodeID" = Table.AddColumn(#"Add Column - HierarchyPath",
      "HierarchyNodeID"
      ,each List.Last(Text.Split([HierarchyPath],"|"))
      ,type text
    ),
    #"Add Column - HierarchyLevel" = Table.AddColumn(#"Add Column - HierarchyNodeID",
      "HierarchyLevel"
      ,each List.Count(Text.Split([HierarchyPath],"|"))
      ,Int64.Type
    ),
    #"Add Column - IsLeafLevel" = Table.AddColumn(#"Add Column - HierarchyLevel",
      "IsLeafLevel"
      ,each List.Contains(
          List.Transform(
            Table.Column(
              Table.NestedJoin(hierarchyTable
              ,childKeyColumnIdentifier
              ,hierarchyTable
              ,parentKeyColumnIdentifier
              ,"LEAFLEVEL.CHILDREN"
              ,JoinKind.LeftAnti
              )
              ,childKeyColumnIdentifier
            )
            ,each Text.From(_)
          )
        ,List.Last(Text.Split([HierarchyPath],"|"))
      )
      ,type logical
    )
The whole caboodle
Below you will find the full code for the function along with some documentation towards the end. You can plug the below code straight into a blank query in Power BI and reference it from your hierarchy query to flatten it.
let
  fFlattenHierarchy = (
    hierarchyTable as table
    ,parentKeyColumnIdentifier as text
    ,parentNameColumnIdentifier as text
    ,childKeyColumnIdentifier as text
    ,childNameColumnIdentifier as text
  ) as table =>
  let
    #"Get Root Parents" = Table.Distinct(
      Table.SelectColumns(
        Table.NestedJoin(hierarchyTable
          ,parentKeyColumnIdentifier
          ,hierarchyTable
          ,childKeyColumnIdentifier
          ,"ROOT.PARENTS"
          ,JoinKind.LeftAnti
        )
        ,{
          parentKeyColumnIdentifier
          ,parentNameColumnIdentifier
        }
      )
    ),
    #"Generate Hierarchy" = fGetNextHierarchyLevel(
      #"Get Root Parents"
      ,parentKeyColumnIdentifier
      ,1
    ),
    fGetNextHierarchyLevel = (
      parentsTable as table
      ,nextParentKeyColumnIdentifier as text
      ,hierarchyLevel as number
    ) =>
      let
        vNextParentKey = childKeyColumnIdentifier & Text.From(hierarchyLevel),
        vNextParentName = childNameColumnIdentifier & Text.From(hierarchyLevel),
        #"Left Join - hierarchyTable (Get Children)" = Table.NestedJoin(parentsTable
          ,nextParentKeyColumnIdentifier
          ,hierarchyTable
          ,parentKeyColumnIdentifier
          ,"NODE.CHILDREN"
          ,JoinKind.LeftOuter
        ),
        #"Expand Column - NODE.CHILDREN" = Table.ExpandTableColumn(#"Left Join - hierarchyTable (Get Children)"
          ,"NODE.CHILDREN"
          ,{
              childKeyColumnIdentifier
              ,childNameColumnIdentifier
          },{
              vNextParentKey
              ,vNextParentName
          }
        ),
        #"Filter Rows - Parents with Children" = Table.SelectRows(#"Expand Column - NODE.CHILDREN"
          ,each Record.Field(_,vNextParentKey) <> null
              and Record.Field(_,vNextParentKey) <> Record.Field(_,nextParentKeyColumnIdentifier)
        ),
        #"Generate Next Hierarchy Level" = if Table.IsEmpty(#"Filter Rows - Parents with Children")
          then parentsTable
          else Table.Combine(
            {
              parentsTable
              ,@fGetNextHierarchyLevel(
                #"Filter Rows - Parents with Children"
                ,vNextParentKey
                ,hierarchyLevel + 1
              )
            }
        )
      in
        #"Generate Next Hierarchy Level",
    #"Add Column - HierarchyPath" = Table.AddColumn(#"Generate Hierarchy",
      "HierarchyPath"
      ,each Text.Combine(
        List.Transform(
          Record.FieldValues(
            Record.SelectFields(_,
              List.Select(Table.ColumnNames(#"Generate Hierarchy")
                ,each Text.StartsWith(_,childKeyColumnIdentifier)
                  or Text.StartsWith(_,parentKeyColumnIdentifier)
              )
            )
          )
          ,each Text.From(_)
        )
        ,"|"
      )
      ,type text
    ),
    #"Add Column - HierarchyNodeID" = Table.AddColumn(#"Add Column - HierarchyPath",
      "HierarchyNodeID"
      ,each List.Last(Text.Split([HierarchyPath],"|"))
      ,type text
    ),
    #"Add Column - HierarchyLevel" = Table.AddColumn(#"Add Column - HierarchyNodeID",
      "HierarchyLevel"
      ,each List.Count(Text.Split([HierarchyPath],"|"))
      ,Int64.Type
    ),
    #"Add Column - IsLeafLevel" = Table.AddColumn(#"Add Column - HierarchyLevel",
      "IsLeafLevel"
      ,each List.Contains(
          List.Transform(
            Table.Column(
              Table.NestedJoin(hierarchyTable
              ,childKeyColumnIdentifier
              ,hierarchyTable
              ,parentKeyColumnIdentifier
              ,"LEAFLEVEL.CHILDREN"
              ,JoinKind.LeftAnti
              )
              ,childKeyColumnIdentifier
            )
            ,each Text.From(_)
          )
        ,List.Last(Text.Split([HierarchyPath],"|"))
      )
      ,type logical
    )
  in
    #"Add Column - IsLeafLevel",
  //Documentation
  fFlattenHierarchyType = type function (
    hierarchyTable as (type table meta [
      Documentation.FieldCaption = "Hierarchy"
      ,Documentation.LongDescription = "A table containing a parent-child hierarchy"
      ]
    )
    ,parentKeyColumnIdentifier as (type text meta [
      Documentation.FieldCaption = "Parent Key Column Identifier"
      ,Documentation.LongDescription = "The name of the column used to identify the key of the parent node in the hierarchy"
      ,Documentation.SampleValues = { "ParentID" }
      ]
    )
    ,parentNameColumnIdentifier as (type text meta [
      Documentation.FieldCaption = "Parent Name Column Identifier"
      ,Documentation.LongDescription = "The name of the column used to identify the name of the parent node in the hierarchy"
      ,Documentation.SampleValues = { "ParentName" }
      ]
    )
    ,childKeyColumnIdentifier as (type text meta [
      Documentation.FieldCaption = "Child Key Column Identifier"
      ,Documentation.LongDescription = "The name of the column used to identify the key of the child node in the hierarchy"
      ,Documentation.SampleValues = { "ChildID" }
      ]
    )
    ,childNameColumnIdentifier as (type text meta [
      Documentation.FieldCaption = "Child Name Column Identifier"
      ,Documentation.LongDescription = "The name of the column used to identify the name of the child node in the hierarchy"
      ,Documentation.SampleValues = { "ChildName" }
      ]
    )
  ) as list meta [
    Documentation.Name = "fFlattenHierarchy"
    ,Documentation.LongDescription = "Returns a flattened hierarchy table from a parent-child hierarchy table input."
      & "The number of columns returned is based on the depth of the hierarchy. Each child node will be prefixed"
      & "with the value specified for the childNameColumnIdentifier parameter"
    ,Documentation.Examples = {
      [
      Description = "Returns a flattened hierarchy table from a parent-child hierarchy table"
      ,Code = "fFlattenHierarchy(barksdaleOrganisation, ""ParentNodeID"", ""ParentNodeName"", ""ChildNodeID"", ""ChildNodeName"")"
      ,Result = "{100,2,3,51,62,""Stringer"",""Shamrock"",""Slim Charles"",""Bodie"",""Pudding"",5,""100|2|3|51|62"",TRUE,62}"
        & ",{100,2,3,51,""Stringer"",""Shamrock"",""Slim Charles"",""Bodie"",4,""100|2|3|51"",FALSE,51}"
      ]
    }
  ]
in
  Value.ReplaceType(fFlattenHierarchy, fFlattenHierarchyType)
Final Thoughts
It looks fairly verbose but in reality, it’s just 10 steps to flatten a hierarchy and bolt on the metadata columns, you could probably blame my code formatting for thinking otherwise. Anyone who is used to seeing common table expressions in SQL will hopefully find the logic defined in the function familiar.
In terms of performance, I’ve not pitted this against other methods nor done any performance testing but I’ve executed it against a ragged hierarchy with 11 levels spanning several thousand rows and it spat out results fairly instantaneously.
Automate Your Power BI Dataset Refresh with Python
Introduction
Most people using Power BI normally do so with Microsoft technology at the core of their business and IT operations. Power BI is rapidly adding connectors for non-Microsoft technologies and new capabilities on a monthly basis. The combination of new sources, excellent visualisation and modelling, and a low price point is leading to it being used with technologies other than the Microsoft data platform.
This blog is the result of one such project. I am currently using Power BI as the main reporting tool on a Google Cloud Platform (GCP) data project. There are lots of interesting topics to discuss given the technologies being used. However, this post is going to focus on the programmatic refreshing of your Power BI datasets using Python. “Why Python?” I hear you say. Well the workflow tool used on GCP is none other than Apache Airflow, implemented as Composer. Apache Airflow is written in Python and you create all of your workflows using Python.
When I looked at the Power BI REST API documentation all of the examples were in C#. After a lot of reading and experimenting (aka hitting my head against my desk), I had the process running the way I wanted. This post is my attempt at creating the document I wish existed when I started.
The main steps
It is important to understand the main steps involved in this process before we get into the detail. Having this high-level process clearly defined was one of the things missing from the information online.
- The first step is to create an App registration for your application. This will provide you with a client id for your app which is needed for authentication later on.
- Next you will grant your App the permissions it requested in Azure AD.
- Using the information from the previous steps you acquire an authentication token from Azure AD in your python code.
- Finally, you use the authentication token to call the Power BI REST API.
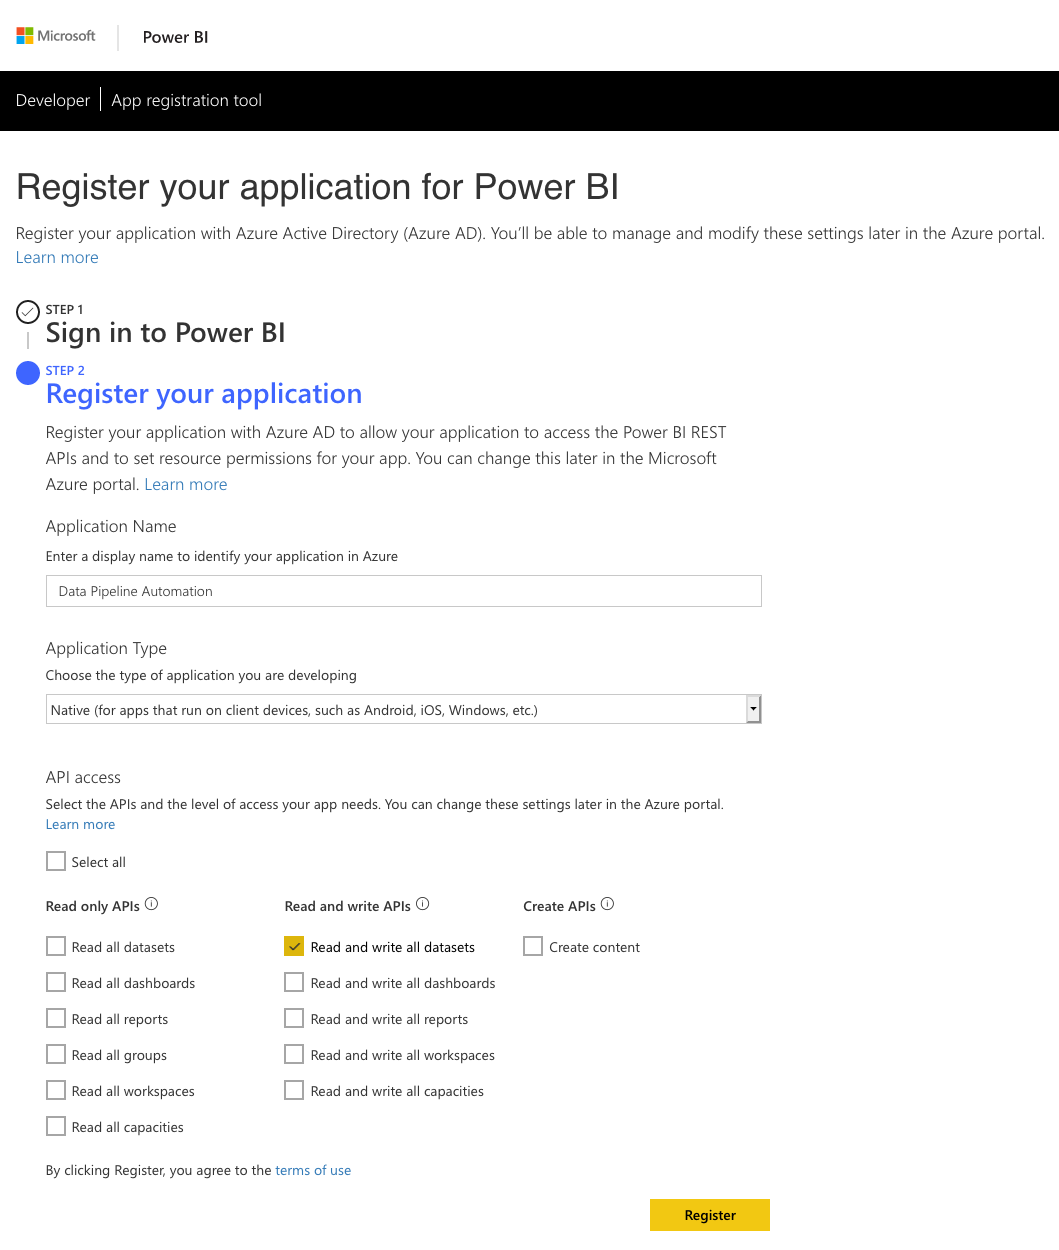
Registering your App
The first and most important part of this entire process is to create a Power BI app registration. There are multiple ways of doing this and this video from Guy in a Cube will give you all of the information you need. No matter how you choose to do your app registration there are three main things you need to know.
1. The Power BI REST API only supports delegated permissions. That means that you need to run any calls to the REST API in the context of a user. For unattended applications, such as our data pipeline step, you need to register your app as a Native app. You only receive the client id when you register it as native app. Server-side Web apps receive both a client id and client secret but this is the wrong type of app for our use case. When you authenticate from your code you will need the client id together with the username and the password of the account that has delegated these permissions to the app.
2. You need to ensure you select the correct permissions when registering your app. For our purposes we need access to Read and write all datasets. As always take the approach of providing the minimum permissions needed. You can always add more permissions later in the Azure Portal.
3. This brings us to the most overlooked yet important point which is granting permissions to the App in the Azure Portal. You need to log into the Azure Portal with the account that will be delegating the permissions to the app. This will be the account of which you will pass the username, password with the client id to authenticate against Azure AD. If you do not perform this step you will end up with authentication errors. (You might get an authentication token when you authorise but you won’t get the correct scope in the access token)

Python and the Power BI REST API
Interacting with the Power BI REST API requires a two-step process.
1. Acquiring an access token from Azure AD by supplying your client id, username and password
2. Calling the desired REST API using the access token received in step 1.
There is a choice in how you can perform step 1. You can choose to either use the ADAL Python library or pure REST calls to obtain the access token.
Before we continue a word of caution. In the examples provided below we have the client id, username and password entered directly in the code. This is for demonstration purposes only. I cannot stress this enough. For production solutions you would want to use the credential management best practice of your platform.
ADAL Library
The adal library for Python is the official Microsoft Azure Active Directory authentication library. It provides you with everything you need to authenticate against Azure AD using Python. Below is an example of the code you will use to authenticate and get your access token. Keep in mind that we have to pass the username and password along with the Client ID. No other way of authenticating will give us a token with the scopes we need to call the Power BI REST API successfully.
import adal

authority_url = 'https://login.windows.net/common'
resource_url = 'https://analysis.windows.net/powerbi/api'

client_id = <INSERT CLIENT ID>
username = <INSERT USERNAME>
password = <INSERT PASSWORD>

context = adal.AuthenticationContext(authority=authority_url,
                                     validate_authority=True,
                                     api_version=None)

token = context.acquire_token_with_username_password(resource=resource_url,
                                                     client_id=client_id,
                                                     username=username,
                                                     password=password)

access_token = token.get('accessToken')
As you can see the adal library makes it extremely easy to authenticate against Azure AD and get the token you need.
REST
An alternative to the ADAL library is normal REST API calls to obtain the token. Below is an example of the code you will use if you were using the requests library to make your REST calls.
import requests

url = 'https://login.microsoftonline.com/common/oauth2/token'
data = {
        'grant_type': 'password',
        'scope': 'https://api.powerbi.com',
        'resource': 'https://analysis.windows.net/powerbi/api',
        'client_id': <INSERT CLIENT ID>,
        'username': <INSERT USERNAME>,
        'password': <INSERT PASSWORD>
       }

r = requests.post(url, data=data)
access_token = r.json().get('access_token')
Refreshing the Power BI Dataset
So now that we have gotten our access token, we can move onto the next step which is refreshing our dataset in Power BI. In order to do this, you will need one or two keys depending on where your dataset is located.
If your dataset is in the workspace of the account under which your app will be running, the “My Workspace” of that account, then you only need the dataset key of your dataset. If, however your dataset is located in an app workspace you will need to get both the group id and the dataset key.
You get these values from the URL in your browser when you navigate to the settings of the dataset. Here are examples for each one of the scenarios.
- Dataset in “My Workspace”: https://app.powerbi.com/groups/me/settings/datasets/XXXXXXXX-XXXX-XXXX-XXXX-XXXXXXXXXXXX
- Dataset in a App Workspace: https://app.powerbi.com/groups/XXXXXXXX-XXXX-XXXX-XXXX-XXXXXXXXXXXX/settings/datasets/XXXXXXXX-XXXX-XXXX-XXXX-XXXXXXXXXXXX

Once you have these keys you are ready to construct your API call to refresh your dataset. The Power BI REST API documentation shows the two different API calls.
- Dataset in “My Workspace” refresh URL: POST https://api.powerbi.com/v1.0/myorg/datasets/{datasetKey}/refreshes
- Dataset in App Workspace refresh URL: POST https://api.powerbi.com/v1.0/myorg/groups/{groupId}/datasets/{datasetKey}/refreshes
Below is an example of the code you would use to refresh a dataset in an App Workspace.
import adal
import requests

authority_url = 'https://login.windows.net/common'
resource_url = 'https://analysis.windows.net/powerbi/api'

client_id = <INSERT CLIENT ID>
username = <INSERT USERNAME>
password = <INSERT PASSWORD>

context = adal.AuthenticationContext(authority=authority_url,
                                     validate_authority=True,
                                     api_version=None)

token = context.acquire_token_with_username_password(resource=resource_url,
                                                     client_id=client_id,
                                                     username=username,
                                                     password=password)

access_token = token.get('accessToken')

refresh_url = 'https://api.powerbi.com/v1.0/myorg/groups/<INSERT GROUP ID>/datasets/<INSERT DATASET KEY>/refreshes'

header = {'Authorization': f'Bearer {access_token}'}

r = requests.post(url=refresh_url, headers=header)

r.raise_for_status()
Conclusion
As you can see it is extremely easy to refresh your datasets in Power BI using Python and the Power BI REST API. The most common mistakes people make which account for the majority of forum posts online are:
- Register their app as the wrong type, Server-side Web app, instead of the correct type which is Native app.
- Not granting the App permissions in the Azure portal using the account in which context it will be running.
- Trying to acquire the Azure AD token using client credentials, client id and client secret, instead of acquiring it with a username and password.
By getting the steps right you will have no problem in automating your Power BI tasks with Python or any other programming language you choose to use.
Alias Azure Analysis Services using Proxies in Azure Functions
Introduction
This post details how to alias Azure Analysis Services using proxies in Azure Functions. A cost-effective, flexible and codeless solution to manage link:// protocol redirects for Azure Analysis Services.
Let’s have a quick recap of the aliasing functionality in Azure Analysis Services before we dive into the implementation detail for this solution.
Connecting to Azure Analysis Services from Power BI Desktop, Excel and other client applications requires end users to specify the Analysis Services server name. For example, when connecting to a server called myanalysisservices, in the UK South region, you would use the address: asazure://uksouth.asazure.windows.net/myanalysisservices. As you can see, it’s a fairly unwieldy and hard to remember approach for connecting to the server from client tools.
An alternate approach is to use a shorter server alias, defined using the link:// protocol e.g. link://<myfriendlyname>. The endpoint defined by the shorter server alias simply returns the real Analysis Services server name in order to allow for connectivity from the client tools. A shorter server alias will (amongst other benefits):
- Provide end users with a friendly name for connecting to the Azure Analysis Services server
- Ease the migration of tabular models between servers by removing any impact on end users and removing the need for large amounts of manual updates to client tool content post migration e.g. changing the datasource in all Power BI reports and Excel connected workbooks
Any HTTPS endpoint that returns a valid Azure Analysis Services server name can provide the aliasing capability. The endpoint must support HTTPS over port 443 and the port must not be specified in the URI.
Additional information on aliasing Azure Analysis Services can be found in the following Microsoft documentation: https://docs.microsoft.com/en-us/azure/analysis-services/analysis-services-server-alias.
Implementation Overview
Components
Implement aliasing for Azure Analysis Services by deploying and configuring the following components:
- CNAME DNS record – Provides your end users with a friendly server name for Analysis Services
- Azure Function App with proxy capabilities – Passes the Analysis Services server name to the client tools
The CNAME destination will be configured to point to the Azure Function App. The Azure Function App will be configured with a proxy entry to serve up the connection information for the Azure Analysis Services server.

Alias multiple servers using one CNAME record by configuring the destination Azure Function App with multiple proxy entries. Each of these proxy entries must be configured with a different route template e.g. link://<myCNAME>/<myProxyEntryRouteTemplate>. Please see implementation detail below for additional information.

Implementation steps
Deploy Azure Analysis Services aliasing by following the steps below (covered in detail later in this post):
- Provision an Azure Function App
- Create a CNAME record for the Azure Function App
- Add the CNAME record to the Azure Function App
- Create proxy entries for each Azure Analysis Services server
Costs
1million executions per month and 400K GB-s worth of resource consumption are provided free as part of the Azure Functions Consumption Pricing Plan. Aliasing provided by the proxy service should fall well within the minimum execution time (100ms) and memory consumption (128MB) thresholds of this price plan. This should put you at < 125K GB-s of resource consumption over 1million executions. After this, charges are £0.15 per 1 million executions (assuming the minimum resource consumption of 100ms runtime @ 128MB memory consumption).
There are alternative pricing plans available, detailed information on Azure Functions pricing can be found here: https://azure.microsoft.com/en-gb/pricing/details/functions/
Implementation Detail
Provision an Azure Function App
- Login to https://portal.azure.com
- Click on Create a resource
- Search for and select Function App
- Click on Create
- Complete the necessary fields on the new Function App blade to create a new Azure Function App.
Take note of the app name for the Azure Function App as you’ll need to use this when creating the CNAME record.

Please note that the name/URL of the Azure Function App is not the HTTPS endpoint which will be used as the alias by your end users. Feel free to name the Azure Funtion App in accordance with your naming conventions as the CNAME record will be used for friendly naming.
It is possible to configure delegated administration, for managing the Azure Function App proxy capability, by assigning the Website Contributor role on the Azure Function App access control list.
Create a new CNAME record for the Azure Function App
Create a new CNAME record with your domain service provider and set the destination for the record to the URL of the newly created Function e.g. myaliashandler.azurewebsites.net
Add the CNAME record to the Azure Function App
- Login to https://portal.azure.com
- Open the Azure Functions blade
- Load the blade for the newly created Azure Function App resource
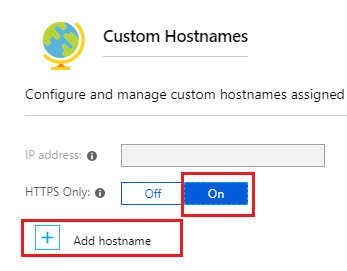
- Click on Platform Features > Custom Domains

-
- Click on Add Hostname
- Add the new hostname
- Click on Validate
- Once validated click on Add Hostname
- Add the SSL Binding by clicking on Add Binding next to the new hostname
- Select the relevant private certificate and click on Add Binding
Upload a private certificate to manage the SSL binding for the new hostname
- Load the blade for the newly created Azure Function App resource
- Click on Platform Features > SSL
- Choose the menu option, Private Certificate > Upload Certificate to upload your private certificate
- Load the blade for the newly created Azure Function App resource
- Click on Platform Features > Custom Domains
- Add the SSL Binding by clicking on Add Binding next to the new hostname
- Select the relevant private certificate and click on Add Binding
Create an alias entry for Azure Analysis Services on the Azure Function App
- Login to https://portal.azure.com
- Open the Functions App blade
- Click on the newly created Azure Function App resource
- Select the + symbol next to Proxies
Name: Add a meaningful name for the proxy
Route template: The path which will invoke this proxy entry
Allowed HTTP methods: GET
Set the following under Response Override
Status code: 200
Status message: accept
Under Headers:
Content-Type: text/plain
Body: The address to the Azure Analysis Services server e.g. asazure://<region>.asazure.windows.net/<server>

- On completion click create
You’ve now successfully configured an alias for your Azure Analysis Services server.
Testing
Azure Function App testing can be carried out in a web browser by connecting to: https://<myFunctionApp>/<myRouteTemplate> e.g. https://myaliashandler.azurewebsites.net/finance. The fully qualified Analysis Services server name should appear in the web browser.
Further testing can be conducted using the CNAME entry, in your web browser try connecting to https://<myCNAME.myDomain.com>/<myRouteTemplate> e.g. https://data.mydomain.com/finance
Finally, from within a client tool which supports the link protocol, connect using link://myCNAME.myDomain.com/<myRouteTemplate> e.g. link://data.mydomain.com/finance
Further Reading
https://docs.microsoft.com/en-us/azure/azure-functions/functions-proxies
https://docs.microsoft.com/en-us/azure/analysis-services/analysis-services-server-alias


