
Copy Files from SharePoint Online using Azure Data Factory and the Microsoft Graph API
In this post we’re discussing how to copy files from SharePoint Online using Azure Data Factory, the Microsoft Graph API and managed identity authentication.
Why use the Microsoft Graph API over the SharePoint API
A lot of existing documentation, including the official ADF documentation, references the SharePoint v1 API, but the v1 API is now considered legacy. The recommendation from Microsoft is that all SharePoint API calls use the SharePoint Online v2 API (Microsoft Graph API) instead.
The biggest benefit to this approach is that there is no need to obtain and pass around a bearer token. As a result, we can cut out the work of setting up service principals, managing those service principal credentials in Azure Key Vault and obtaining those service principal credentials at Azure Data Factory runtime.
Copy activities in both the SharePoint v1 and v2 APIs are executed using an HTTP connector. When using the SharePoint v1 API an Authorization header is required. The HTTP connector doesn’t support managed identity authentication. As a result, a bearer token must be obtained and used in the copy activity. In contrast, the Microsoft Graph API short-lived pre-authenticated download URLs (@microsoft.graph.downloadUrl) do not require an Authorization header to download a file. Therefore, we can use an anonymous HTTP connection to complete the download in the copy activity.
Web activities provide native support for user assigned managed identity, these can be used in both the SharePoint v1 and Graph API with managed identity authentication i.e. without a Authorization header and bearer token.
As a side note, The REST linked service does support managed identity authentication, but it does not support the necessary file based datasets that would be required for the file based copy activity.
Moving on to the task at hand…
For the purpose of this blog, we’re going to use a User Assigned Managed Identity. A System Assigned Managed Identity could also be used, with a few small changes to the instructions below,
The required steps are as follows
- Create a user assigned managed identity
- Grant Microsoft Graph API access rights to the user assigned managed identity
- Create Data Factory elements to navigate the Graph API and copy a file using the user assigned managed identity
Create a User Assigned Managed Identity
Programmatic access to the Graph API from Azure Data Factory is achieved using a user assigned managed identity. A user assigned managed identity can be created in the Azure Portal. Detailed steps below:
- Sign in to the Azure portal.
- Navigate to Managed Identities.
- Select Create
- Set appropriate values for Subscription, Resource Group, Location and Name in accordance with your environment
- Click on Review and Create
- Once created, note the Object (principal) ID in the resource Overview menu, you will need this later when assigning rights to the managed identity
Example:

Grant Graph API Access Rights to the User Assigned Managed Identity
It’s not possible to assign Graph API access rights to a user assigned managed identity in the Azure Portal. This must be done programatically. Based on requirements, the user assigned managed identity can be assigned the following rights.
| Permission | Description |
|---|---|
| Sites.Read.All | Read items in all site collections |
| Sites.ReadWrite.All | Read and write items in all site collections |
| Sites.Manage.All | Create, edit, and delete items and lists in all site collections |
| Sites.FullControl.All | Have full control of all site collections |
| Sites.Selected | Access selected site collections |
To copy files and navigate folders in this demo, we are going to assign the Sites.Read.All right. Best practice is to assign least privilege.
Using Powershell:
Connect-AzureAD
$ManagedIdentity = Get-AzureADServicePrincipal `
 -ObjectId "<Object (principal) ID>"
$GraphAPI = Get-AzureADServicePrincipal `
 -Filter "DisplayName eq 'Microsoft Graph'"
$SitesReadAll = $GraphAPI.AppRoles | where Value -like 'Sites.Read.All'
New-AzureADServiceAppRoleAssignment `
 -Id $SitesReadAll.Id `
 -ObjectId $ManagedIdentity.ObjectId `
 -PrincipalId $ManagedIdentity.ObjectId `
 -ResourceId $GraphAPI.ObjectId
Create Data Factory Elements to Navigate the Graph API and Copy a File
At this point we have a user assigned managed identity with read access to SharePoint Online via the Graph API. Consequently, we can now proceed to setup Azure Data Factory.
Register the User Assigned Managed Identity as a Credential in Azure Data Factory
- From within Azure Data Factory
- Navigate to Manage > Credentials
- Select New
- Name: Set appropriate value
- Type: User Assigned Managed Identity
- Azure Subscription: Select the subscription you used when creating the managed identity
- User Assigned Managed Identities: Select the managed identity you created
- Click on Create
Example:

Create Linked Services and Datasets to Support the Copy Activity
Below is a list of components we’ll need to create in Azure Data Factory for the copy activity.
- HTTP linked service for SharePoint Online
- Binary dataset that uses the HTTP linked service
- Azure Data Lake Gen2 linked service, this will be our sink for the purpose of this demo
- Binary dataset that uses the Azure Data Lake Gen2 linked service, this will be our sink dataset for the purpose of this demo
Create Linked Services
The sink components are not discussed in this post, additional detail and examples of Azure Data Lake Gen2 connectors can be found here.
Your HTTP linked service should use anonymous authentication and a parameter for passing in a dynamic URL. Configuration details below:
- HTTP linked service:
- Base URL: @{linkedService().URL}
- Authentication type: Anonymous
- Parameters: URL
Example:

Create Datasets
The sink components are not discussed in this post, additional detail and examples of Azure Data Lake Gen2 connectors can be found here.
- Binary Dataset
- Linked Service: Select HTTP linked service created above
- URL:
@dataset().URL - Parameter: URL, this will be used to pass the URL to the HTTP linked service
Example:

Create the Copy Activity Pipeline
We now have the necessary source and sink components in place to initiate a copy activity. Let’s put together a pipeline with a few activities that will ultimately download a file. In this pipeline demo we’re going to do the following:
- Get the SharePoint SiteID, subsequent API calls will require this
- Get a list of drives for the SharePoint site and filter this to the ‘Documents’ drive, this equates to https://<tenant>.sharepoint.com/sites/<site>/Shared%20Documents/ in my SharePoint tenant. Subsequent API calls require the Drive ID
- Get a download URL for a file in the Documents drive, pass this download URL onto a Copy activity
- Execute a copy activity that uses a HTTP source, referencing the download URL, and Data Lake Gen 2 sink
It’s well worth looking at the API documentation referenced below. There are multiple ways to navigate drives and search for files. Consequently, for your use case, you may find some methods more efficient than others.
Get the SharePoint SiteID
In a new empty pipeline create a web activity to fetch the SharePoint SiteID:
- Name: Get-SharePointSiteID
URL: https://graph.microsoft.com/v1.0/sites/<tenant>.sharepoint.com:/sites/<site> e.g. https://graph.microsoft.com/v1.0/sites/myTenant.sharepoint.com:/sites/mySite - Method: GET
- Authentication: User Assigned Managed Identity
- Resource: https://graph.microsoft.com
- Credentials: Select the credential you registered earlier
Store the SharePoint SiteID in a variable
Create a SiteURL variable, and use the output of the web activity above to set the variable to the SharePoint SiteID in a Set Variable activity
- Value:
@concat(
    'https://graph.microsoft.com/v1.0/sites/'
    ,activity('Get-SharePointSiteID').output.id
)
Get a list of drives for the SharePoint site
Create a web activity to fetch the list of drives:
- Name: Get-Drives
- URL:
@concat( variables('SiteURL') ,'/drives' ) - Method: GET
- Authentication: User Assigned Managed Identity
- Resource: https://graph.microsoft.com
- Credentials: Select the credential you registered earlier
Filter to the ‘Documents’ drive
Create a filter activity to filter to the Documents drive
- Name: Filter-Documents
- Items:
@activity('Get-Drives').output.value - Condition:
@equals(item().name,'Documents')
Get a download URL for a file in the Documents drive
Create a web activity to obtain a download URL for a file called data.csv in the General folder.
- Name: Get-File
- URL:
@concat( variables('SiteURL') ,'/drives/' ,activity('Filter-Documents').output.value[0].id ,'/root:/General/data.csv' ) - Method: GET
- Authentication: User Assigned Managed Identity
- Resource: https://graph.microsoft.com
- Credentials: Select the credential you registered earlier
Copy the file
Create a copy activity that uses a HTTP source, referencing the download URL
- Source dataset: Select the binary dataset you created earlier
- URL:
@activity('Get-File').output['@microsoft.graph.downloadUrl'] - Request Method: GET
Configure the sink based on your requirements. If you are using a binary source dataset (as per this demo) you will have to use a binary sink dataset.
Well, that about sums up how we copy files from SharePoint Online using Azure Data Factory and the Microsoft Graph API. I hope this helps you in your quest to remove those nasty bearer tokens from your workflows and move towards a world of managed identity.
Reference documentation
Azure Data Factory Development with GitFlow – Part 1
If you’re using or planning to use Git integration with Azure Data Factory then it’s well worth taking the time to define a suitable branching model for managing the various life-cycles of your project (think feature, hotfix and release). In this short series, I’ll discuss how we can structure our Azure Data Factory development with GitFlow, an easy to comprehend branching model for managing development and release processes.
Part 2: Implementation Detail
In part 1 of this series, you’ll get an overview of the various components which make up the solution. I’ll follow this up in part 2 with the implementation detail on how to deploy and configure your Data Factory environments to tie them in with the workflow. If all goes to plan we should land up with something along the lines of the below:
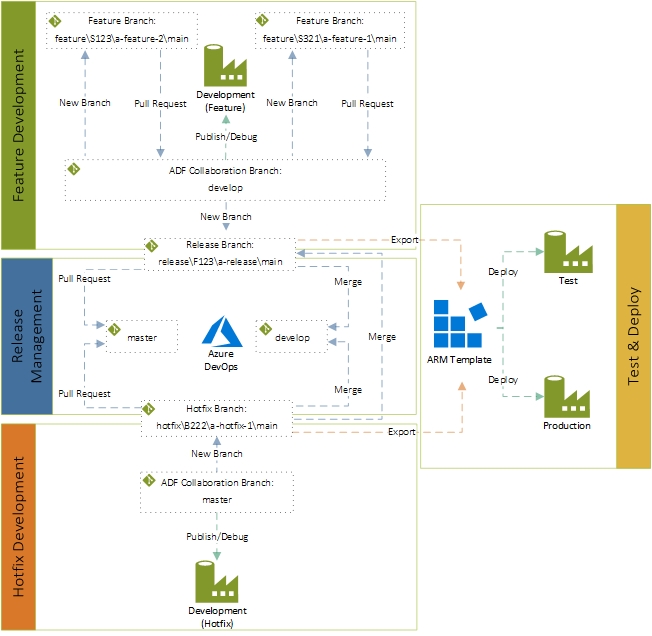
Component Overview
Now that we sort of know where we’re heading, let’s take a closer look at a few of the components that will make up the solution, namely:
- Git integration in Azure Data Factory UI for maintaining our source code
- GitFlow branching model, a structured approach to align our source code with the project life-cycle
- Continuous integration and delivery (CI/CD) in Azure Data Factory for the deployment of Data Factory entities (pipelines, datasets, linked services, triggers etc.) across multiple environments
- Azure DevOps for additional controls not available in the Azure Data Factory user interface
- Azure Data Factory for obvious reasons
Git integration in Azure Data Factory UI
With Azure Data Factory Git integration you can source control your Data Factory entities from within the Azure Data Factory UI, unfortunately, it does come with a few bugbears:
- Changes to the Data Factory automatically result in a commit e.g. new ADF entity (pipeline, connection etc.) = new commit
- Assigning Azure DevOps work items to a commit is not possible (use Azure DevOps instead)
- Merging between branches is only possible as part of a pull request
- The ability to publish a Data Factory is available from the collaboration branch only
For a more detailed look at the Git integration functionality in Azure Data Factory, have a read through the official documentation.
GitFlow branching model
First introduced by Vincent Driessen, GitFlow is a branching model for Git repositories which defines a method for managing the various project life-cycles. As with all things in life, there are lovers and haters but personally, I’m very fond of the approach. Having used it successfully on numerous projects I can vouch that, on more than one occasion, it has saved me from a merge scenario not too dissimilar to Swindon’s Magic Roundabout.
For those of you not familiar with GitFlow it’s well worth spending a few minutes reading through the details at nvie.com. In summary, and for the purpose of this post, it uses a number of branches to manage the development life-cycle namely master, develop, release, hotfix and feature. Each branch maintains clean, easy to interpret code which is representative of a phase within the project life-cycle.

Continuous integration and delivery (CI/CD) in Azure Data Factory
Continuous integration and delivery, in the context of Azure Data Factory, means shipping Data Factory pipelines from one environment to another (development -> test -> production) using Azure Resource Manager (ARM) templates.
ARM templates can be exported directly from the ADF UI alongside a configuration file containing all the Data Factory connection strings and parameters. These parameters and connection strings can be adjusted when importing the ARM template to the target environment. With Azure Pipelines in AzureDevOps, it is possible to automate this deployment process – that’s possibly a topic for a future post.
For a more detailed look at the CI/CD functionality in Azure Data Factory, have a read through the official documentation.
Azure DevOps
Azure DevOps is a SaaS development collaboration tool for doing source control, Agile project management, Kanban boards and various other development features which are far beyond the scope of this blog. For the purpose of this two-part post we’ll primarily be using Azure DevOps for managing areas where the ADF UI Git integration is lacking, for example, pull requests on non-collaboration destination branches and branch merges.
Azure Data Factory
To support the structured development of a Data Factory pipeline in accordance with a GitFlow branching model more than one Data Factory will be required:
- Feature and hotfix branch development will take place on separate data factories, each of which will be Git connected.
- Testing releases for production (both features and hotfixes) will be carried out on a third Data Factory, using ARM templates for Data Factory entity deployment without the need for Git integration.
- For production pipelines, we’ll use a fourth Data Factory. Again, as per release testing, using ARM templates for Data Factory entity deployment without the need for Git integration.
Of course, there are no hard or fast rules on the above. You can get away with using fewer deployments if you’re willing to chop and change the Git repository associated with the Data Factory. There is a charge for inactive pipelines but it’s fairly small and in my opinion not worth considering if additional deployments are going to make your life easier.
…to be continued
That covers everything we need, I hope you’ve got a good overview of the implementation and formed an opinion already on whether this is appropriate for your project. Thanks for reading. Come back soon for part 2!


